
Introduction
Welcome to the Resource Watch API Developer Documentation.
Who is this for?
This section covers the behind-the-scenes details of the RW API, that are relevant for developers trying to build their own RW API microservice. If you are looking for instructions on how to use the RW API to power your applications, the RW API Documentation is probably what you are looking for.
The developer documentation is aimed at software developers that are familiar with the RW API from a user perspective, and want to extend or modify the functionality of the API. From a technical point of view, this section assumes you are familiar with some technologies, protocols and patterns that are used on the RW API, such as:
- HTTP and HTTPS
- Microservices architecture
- Docker
- Terraform
- Kubernetes
- Amazon Web Service, with a stronger focus on EKS, API Gateway and EC2.
This guide also assumes you are comfortable with programming in general. To keep these docs simple, and as most of the RW API source code is written in nodejs, that is the language we'll use for examples or when presenting specific tools and libraries. However, while we recommend using Nodejs, you may use different tools and/or languages when developing your microservices.
If any of these concepts are new or unfamiliar, we suggest using your favourite search engine to learn more about them before proceeding.
A note on Control Tower
Throughout the RW API ecosystem (these docs, microservice README, etc) you may find leftover references to "Control Tower". Control Tower is the name of an application that was used at the core of the RW API, but has since been replaced for alternatives:
- Request routing is now handled by AWS API Gateway (and Localstack).
- User management is now handled by the
authorizationmicroservice. - Fastly integration is now done by the RW API integration libraries.
If you find references to Control Tower, those are most likely outdated documentation/example configuration bits, that are either no longer in use, or have been modified to match the new stack.
API Architecture
This chapter covers the basic architectural details of the API. If you are new to RW API development, you should start here, as key concepts explained here will be needed as you go more hands-on with the API code and/or infrastructure.
Overall architecture
The RW API is built using a microservices architecture using AWS API Gateway as the gateway application. The microservices are deployed in a Kubernetes cluster, available as NodePort Services and deployed as Pods.
Data is stored in multiple formats and services, ranging from databases running as Kubernetes Services, to SaaS solutions like S3 or RDS.
Routing
API Gateway receives all incoming requests to the RW API, and matches the HTTP verb and path with a set of preconfigured values, forwarding it to one of several backend (Kubernetes) services it can reach. Each of these services corresponds to a RW API Microservice, which is responsible for implementing the functionality for that endpoint.
Microservices that communicate with each other also use API Gateway for the same purpose - this way, microservices don't need to be able to reach each other directly, they just need to know how to reach the gateway, simplifying implementation.
Internal communication between the gateway and the microservices is done through HTTP requests, and as such each microservice is built on top of a web server. These different web servers create a network within the API itself, to which will refer throughout the rest of the documentation when we mention "internal network" or "internal requests". By opposition, an "external request" will reference a request from/to the world wide web, and "external network" basically means "the internet". Note that these are not actual networks (real or virtual), and the origin of a request is fully transparent to both the gateway as well as the microservices.
Microservices
A microservice is a small application, typically with running a web server, that implements a subset of the functionality of the RW API. Said functionality is often exposed as public endpoints on the RW API, through API Gateway routing rules that map a publicly available URL to a microservice - allowing API Gateway to forward an incoming request from the www to the microservice itself.
Microservices also communicate with each other, typically through HTTP requests, that use the same routing strategy and services as described above for public requests. Some microservices communicate with each other using other channels, like pub/sub.
Microservice dependency graphs
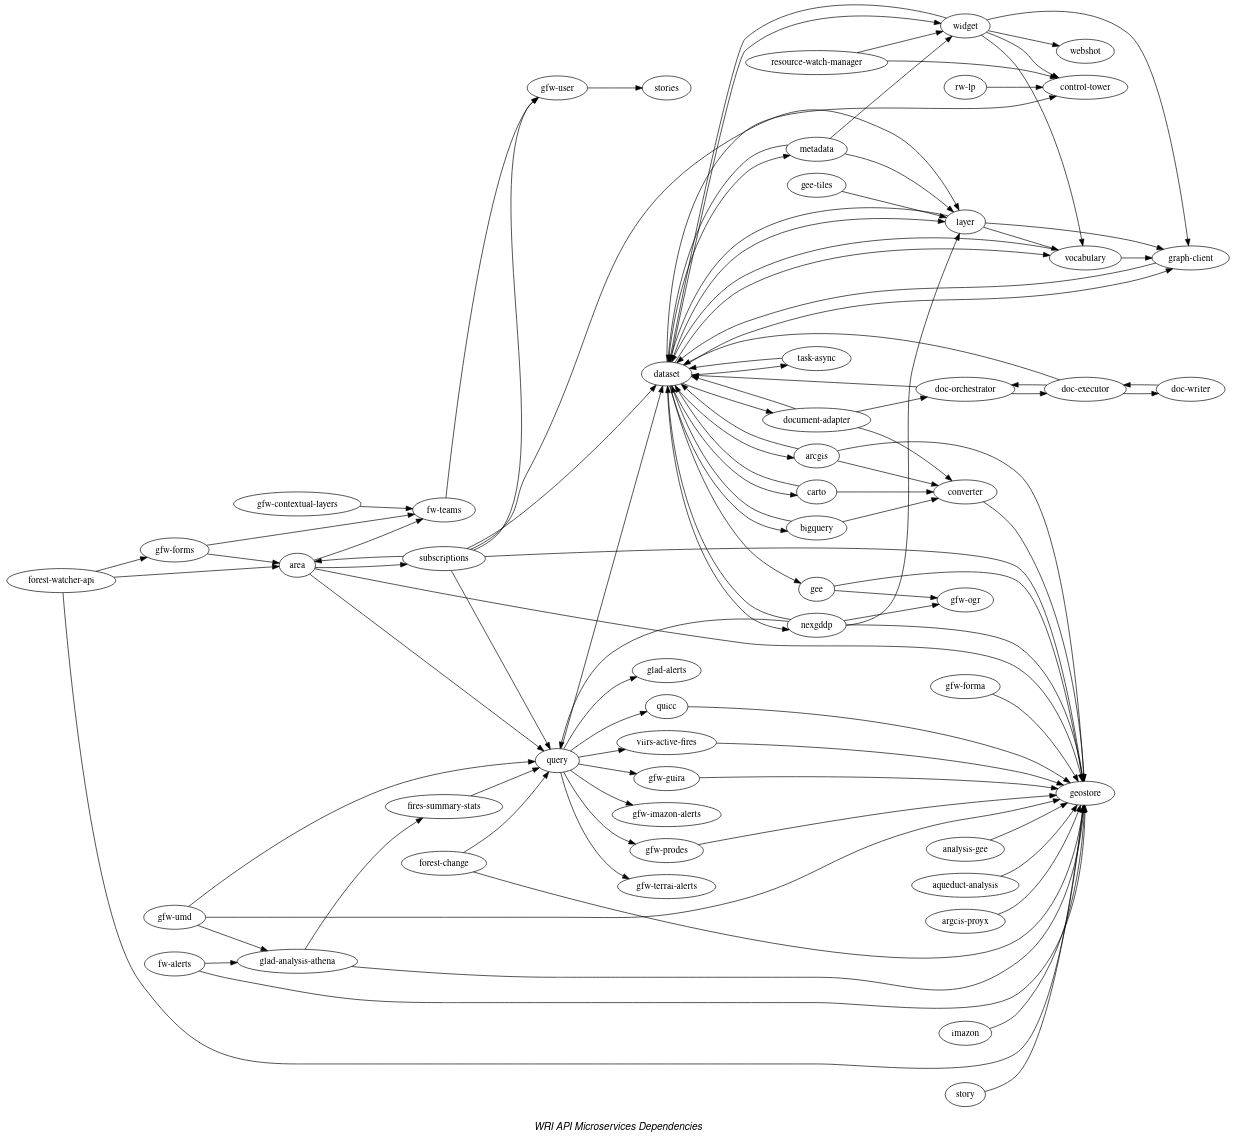
The graph above illustrates the dependencies between different microservices as of July 2020. Most dependencies are
based on endpoint calls: an arrow pointing from query to dataset means that the query microservice makes a call to
one of the endpoints implemented by the dataset microservice. The exception to this rule
are doc-orchestrator, doc-executor and doc-writer, who instead depend on each other
via RabbitMQ messages.
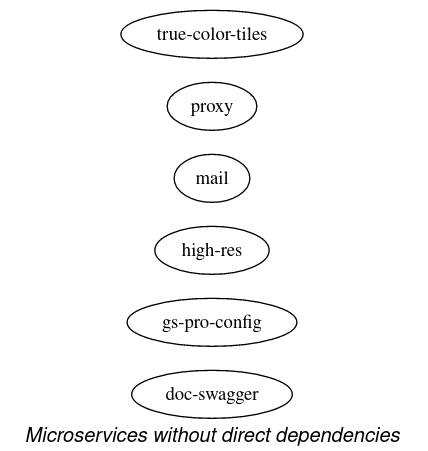
The microservices above do not depend on any of the other microservices.
All microservices with public-facing HTTP endpoints depend on the authentication microservice to handle user management.
Data layer dependencies
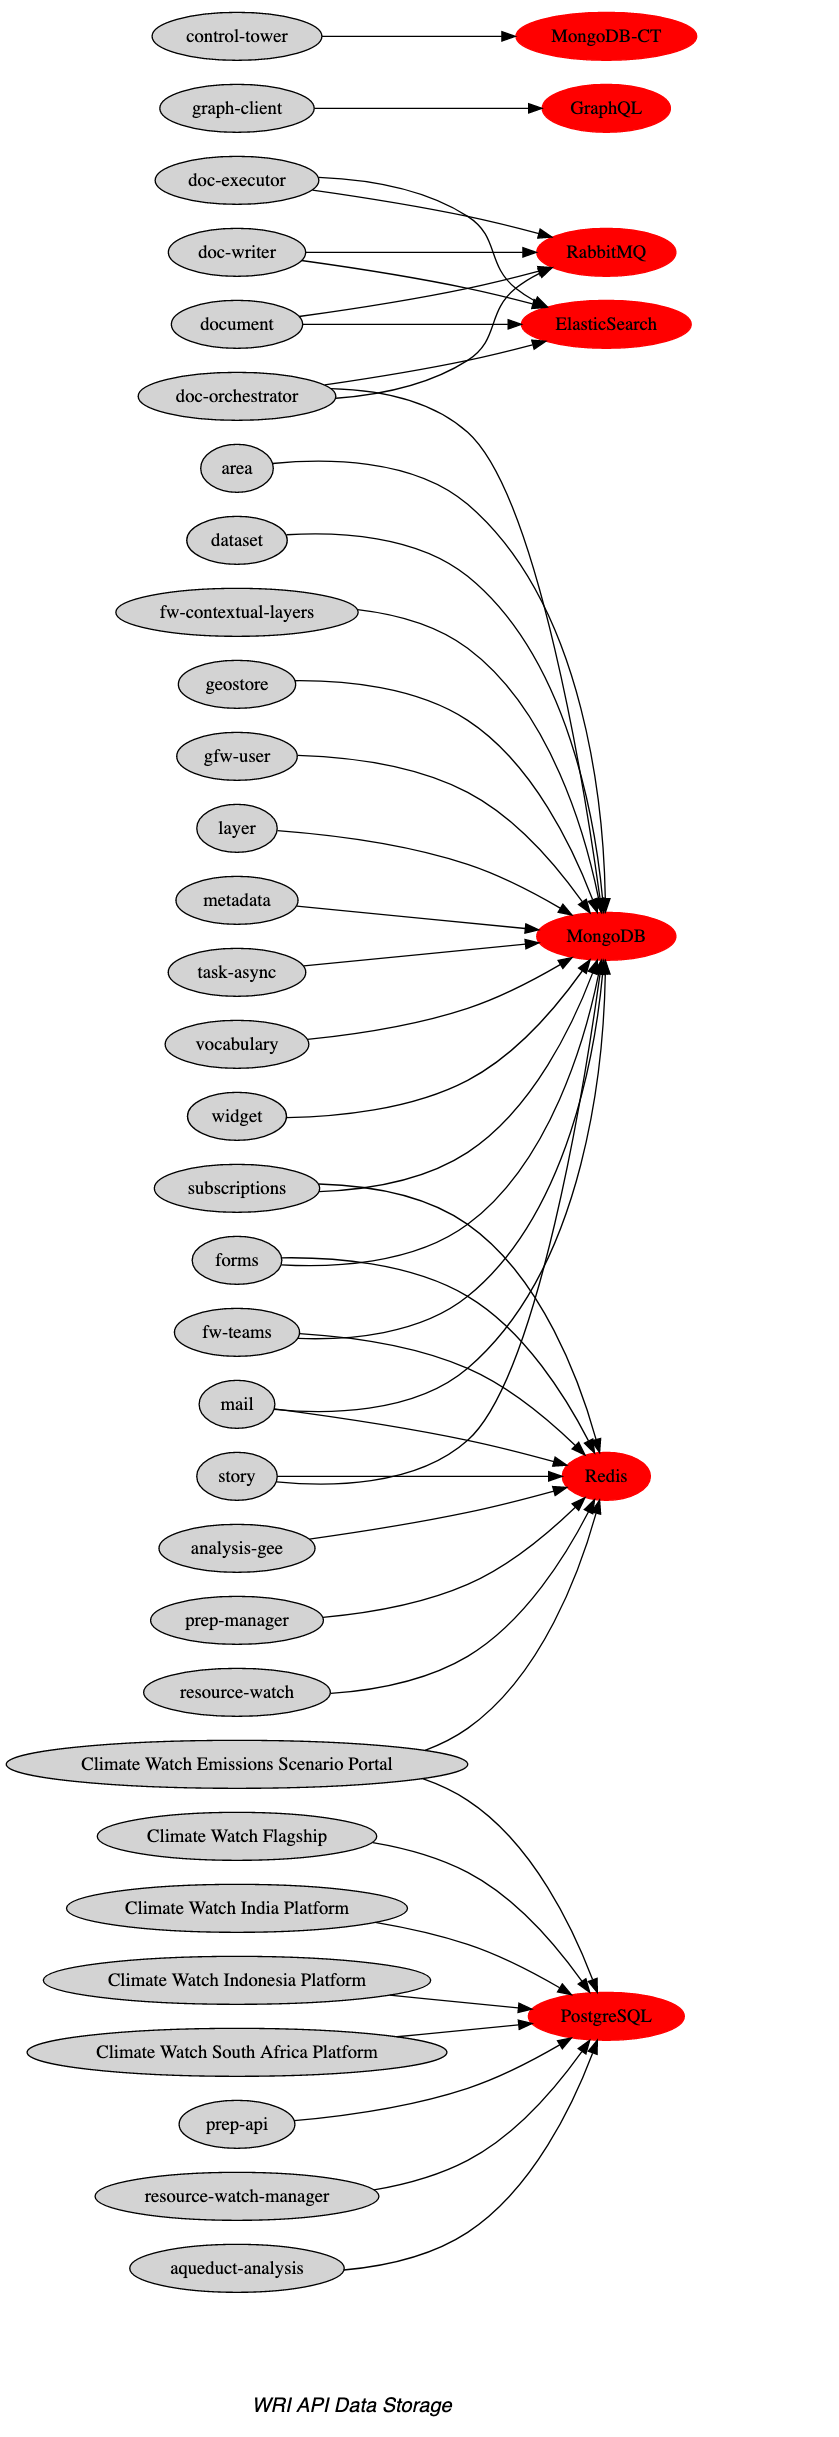
The graph above illustrates the different data layer elements present on the RW API, and the microservices or sites that depend on each of these.
HTTP Caching
In the production environment, end user requests to the RW API are initially intercepted by an HTTP cache, implemented using Fastly. This is mostly transparent to both users and developers, except in certain scenarios that will be detailed as part of the development guide below.
Lifecycle of a request
A typical API call will go through the following steps, between the request being received, and the response being returned to the client application:
- An HTTP request from the www is issued to the RW API
- The DNS resolves to an AWS API Gateway instances (in the production environment, there is a prior Fastly cache step)
- Based on its internal configuration, API Gateway will route this request to one of several nodes (EC2 instances) that make up the Kubernetes (AWS EKS) cluster, and to a specific Kubernetes Service - a RW API Microservice.
- This service, implemented by Kubernetes Pods, will handle the HTTP request and generate the corresponding HTTP
response. It may also, optionally:
- If a JWT token is present, it will send that token to the Authorization service, which handles user data validation and storage.
- Depending on the logic of the endpoint being accessed, each microservice may reach out to other microservices, using HTTP requests, to load additional information. These requests are routed through API Gateway, like the original request from the www.
- The response is returned to API Gateway, and from it to the original requester.
Infrastructure as code
The above described infrastructure is manages using Terraform, an Infrastructure as code solution that allows capturing all that complexity in a Github repository.
Microservice development guide
In this chapter, we'll cover additional details that you, as a RW API developer, should keep in mind when developing your microservice. We'll focus not only on the technical requirements you need to meet for your microservice to communicate with the remaining RW API internal components, but also discuss the policy surrounding development for the RW API, as a way to achieve a certain degree of consistency across a naturally heterogeneous microservice-based system.
Microservice overview
As described in the API Architecture section, microservices are small web applications that expose a REST API through a web server. This means that microservices can be built using any programming language, just as long as it supports HTTP communication. In practical terms, most of this API's core microservices are built using nodejs, with Python and Rails being distant 2nd and 3rd respectively. New microservices being developed should respect this hierarchy when it comes to choosing a development language, and the adoption of a different stack should be validated with the remaining development team members beforehand.
In this whole section, we will use code examples from the Dataset microservice, which is built using nodejs. We will discuss the general principles, which should apply to all implementations, as well as implementation details, which may apply to your scenario if you are also using nodejs, or that may not apply if you are using something else.
Development lifecycle
As a developer of the RW API, your ultimate goal is to make an improvement to the API source code and push it to the production environment. Of course, this is an overly simplistic description of a complex process, and the goal of the next section is to dive deeper into the steps you need to take to achieve that. Breaking this down into a more detailed list, these are the high-level steps you'll need to take in order to contribute to the RW API:
- Checkout the code
- Run it locally
- Make a feature branch
- Write your code
- Test your feature branch locally
- Push your code to Github
- Make a PR from your feature branch to
devand request review from peers - Wait for Travis' and reviewer approval, then merge your code
- [Optional] Deploy your changes to the
devcluster for testing in a real-world infrastructure. Check with team if changes require this level of testing and spin up cluster before deploying if it is in hibernation. - Make a PR from
devtostaging, wait for Travis' approval, then merge your code. - Make an announcement about an upcoming changes, deploy to
stagingand test your code with real-world data. - Make a PR from
stagingtoproduction, wait for Travis' approval, then merge your code. - Make an announcement about an upcoming changes, deploy to
productionand test your code.
In the next sections we'll dive deeper into the details of each step.
Setting up a development environment
In this section, we'll cover the details of how you can configure your operating system to be used as a development environment for the Dataset microservice, which is built using nodejs. These instructions will apply, without major changes, to all other nodejs-based microservices. For microservices based on Python or Rails, and when using Docker, you should also be able to use these instructions. Native execution for Python and Rails microservices is done using equivalent commands, which we'll outline as we go.
Note that these instructions aim at giving you the details about what's specific to the RW API, and it's not a step-by-step list of commands you can copy-paste. For example, we will not cover the details of how to install dependencies - that's something best answered by that particular piece of software's documentation page for your operating system, which you can easily find with your favourite search engine.
Also, when applying these instruction to different microservices, be sure to review their respective README.md file
for a comprehensive list of dependencies you'll need, or other specific details about its setup process.
Execution - native vs Docker
All microservices can be executed in two ways: natively or using Docker. If you are not familiar with Docker, we suggest briefly learning about it does before proceeding. In a nutshell, it simplifies setup and execution, at the expense of varying performance hit, depending on your operating system. Here are a few key points you should consider when making a decision between executing natively or using Docker:
- When using Docker, you typically do not need to set up any other dependency for any microservice - Docker will take care of that for you.
- On Windows and Mac, Docker will run a small Linux virtual machine behind the scenes, which will mean a noticeable increase in resource consumption and a reduction in runtime performance, when compared to native execution. When using linux, that does not happen, and runtime performance and resource usage is roughly equivalent to native execution.
- Docker does have its quirks, and it does come with a bootstrap time penalty when running your code, so if you are not very familiar with it, or are used to native execution of nodejs, Python or Rails code, it may pay off to use that approach.
- The final service will run inside a Docker container. When using Docker containers during development, you reduce the risks of "it worked on my machine" type of problems.
Using native execution
Getting the code
The first step will be getting the source code from Github to your computer using the Git CLI (or equivalent).
git clone https://github.com/resource-watch/dataset.git
Or, if you prefer, you can use:
git clone git@github.com:resource-watch/dataset.git
Installing dependencies
In the source code you just downloaded, you'll find a README.md file with detailed instruction for the microservice,
including dependencies you'll need to install.
For all Node.js microservices, you'll need to install Node.js and Yarn. Rather than installing Node.js from the official website, we recommend using nvm, which allows you to easily install and manage different Node.js versions on your computer, since different microservices may require different versions of Node.js to run.
# Install Node.js v20.4 for the dataset microservice
nvm install 20.4

# Switch to the v0.4 installation
nvm use 20.4
Once you've installed a version manager like nvm, you need to check which version of the language to install. For
Node.js microservices, the package.json file typically has a engine value which will tell you which version(s) of
Node.js are supported. Another place where you'll find this info (which also works for other languages) is the content
of the Dockerfile (typically in the first line) - in the dataset microservice, for
example, FROM node:20.4-alpine3.18 means this microservice runs on Node.js v20.4.
# To install dependencies, navigate to the directory where you cloned the microservice and run:
yarn
Yarn is a package manager for Node.js applications (a spiritual equivalent to pip for Python or Bundler for Ruby). Once it's installed, be sure to use it to install the necessary libraries (see right).
The microservice's README may specify additional dependencies you need to
install. MongoDB, for example, is a common dependency of many RW API microservices, with
applications
like Postgres, Redis, RabbitMQ
or Open Distro for Elasticsearch also being required on certain
microservices. If a version number is not identified on the README.md file, the docker-compose-test.yml file may
help. image: mongo:3.6 means this microservice depends on MongoDB v3.6.
Besides these dependencies, microservices may also depend on other microservices, for complex functionality or user management. We'll dive deeper into that on the Local gateway section. If your endpoint does not rely on other microservices or use user data, you can ignore that section.
A note on dependencies
Due to a recent infrastructure migration, some README files may mention old dependencies that have since been replaced
with newer equivalents. Here are the old dependencies you may find, and their newer equivalent:
- Elasticsearch 5: it has been replaced by AWS Elasticsearch Service (based on Elasticsearch 7), which is based on Open Distro for Elasticsearch.
Configuration
With the dependencies set up, it's time to configure the microservice. This is done using environment variables (env vars) which you can define in multiple ways, depending on your OS, way of executing the code (e.g. many IDEs have a "Run" feature that allow configuring environment variables using a GUI) and personal preference. For this tutorial, and going forward, we'll assume you'll run the code from a terminal and specify the environment variables inline.
NODE_ENV=production SOME_VARIABLE=some-value <more variables> <your command>
To find out more about which env vars you can/need to specify, refer to the microservice's README.md file, as it
typically documents the main variables available to you. Nodejs-base microservices will often have a full list in
the config/custom-environment-variables.json file. The docker-compose-test.yml and docker-compose-develop.yml
files contain usages of said variables, and may be helpful if you are looking for an example or an undocumented
variable.
As a rule of thumb, env vars configure things like databases address and credentials, 3rd party services (for example, an AWS S3 bucket URL or AWS access credentials), or gateway URL.
Starting the microservice
# Starting a Node.js microservice:
yarn start

# Node.js using inline environment variables:
NODE_ENV=production <your other environment variables> yarn start

# Starting a Python microservice may look something like this:
python main.py

# Rails-based microservices can rely on the traditional Rails CLI:
rails server
Once you have determined the values you'll need to run your microservice with the desired configuration, you should have
everything ready to run it. For nodejs based microservice like Dataset, you can do this by running yarn start. For
other languages, the startup command will be different (see right).
You can also review the entrypoint.sh file content, under the start or develop sections, as it will contain the
command you need to execute to run the code natively.
The application should output useful information, like database connection status and HTTP port. Overall, if no error message is produced, the microservice should be up and running, and available at the port specified by its output.
Running the tests
# Running tests for a Node.js microservice:
yarn test

# Node.js with environment variables:
NODE_ENV=test <your other environment variables> yarn test

# Python:
exec pytest <test folder>

# Ruby:
bundle exec rspec spec
Most microservices (hopefully all in the future) come with tests included. Running these tests can help you identify issues with your code changes, and are required for any new modifications merged into the RW API. It's recommended that you run tests locally before pushing changes to Github.
Tests sometimes mock certain dependencies, like external 3rd party service, but often require an actually running
database, as a native execution would (think MongoDB or Postgres). Check the docker-compose-test.yml for whatever
services it runs besides the microservice - those are the dependencies you'll need to have up and running to run the
tests natively. The gateway is not required to run the tests.
Test execution requires roughly the same env vars as running the actual microservice. For microservices that rely on a database, make sure you are not using the same database as you do for development purposes - tests assume database isolation, and will delete preexisting data.
See right for how to run tests for microservices in different languages. You can also review the entrypoint.sh file
content, under the test section, which will contain the exact command you need to execute.
Common errors and pitfalls
- Your microservice cannot connect to MongoDB/other database: ensure that the corresponding service is running and
listening on the configured address and port - be mindful that
localhost,127.0.0.1and your local IP are not always interchangeable. Also confirm user and password data. - Your microservice crashes when handling an API call, trying to reach a network address: this may be your microservice trying to reach another microservice through the gateway. Make sure that both the gateway and the necessary dependent microservices are up and running, and that all microservices involved are registered in the gateway.
- Your microservice has user-related issues, even though you are providing a
Bearertoken: Bearer tokens are processed by theauthorizationmicroservice, which is reached through the gateway. Ensure both are up and running, and check their respective logs for more clues to what may be going wrong. - Your tests keep failing: This can be due to multiple reasons. Check the microservice's travis status (link in the
README.md) to see if it's just you, or if there's an issue with the preexisting code base. Run your tests a few more
times and see if the output is consistent - some tests are not deterministic, and have varying results. Ensure your
env vars are correct - check
docker-compose-test.ymlor.travis.ymlfor examples on values.
Using Docker
Getting the code
The first step will be getting the source code from Github to your computer using the Git CLI (or equivalent).
git clone https://github.com/resource-watch/dataset.git
Or, if you prefer, you can use:
git clone git@github.com:resource-watch/dataset.git
Installing dependencies
As we mentioned before, if you decide to use Docker, your only dependency will be Docker itself (and docker-compose, which comes included). Depending on your OS, Docker installation instructions will differ, but your favourite web search engine will hopefully point you in the right direction.
When you run Docker, it will automatically fetch the necessary dependencies and run them for you. However, if you are not using Linux, you may have to fine-tune some settings so that dependencies like MongoDB can communicate with your microservice - we'll review this in detail in a bit.
Note that Docker will not fetch nor run the gateway for you - if you want to execute your microservice in integration with other microservices, you'll have to set it up manually. We'll dive deeper into that on the Local gateway section. If your endpoint does not rely on other microservices or use user data, you can ignore that section.
Configuration
Configuration for Docker based execution is done
using environment variables (env vars) passed to the Docker
runtime using a special dev.env file. Some microservices will include a dev.env.sample or equivalent that you can
copy-paste and use as a starting point when configuring your environment.
To find out more about which env vars you can/need to specify, refer to the microservice's README.md file, as it
typically documents the main variables available to you. Nodejs-base microservices will often have a full list in
the config/custom-environment-variables.json file. The docker-compose-test.yml and docker-compose-develop.yml
files contain usages of said variables, and may be helpful if you are looking for an example or an undocumented
variable.
As a rule of thumb, env vars configure things like databases address and credentials, 3rd party services (for example, an AWS S3 bucket URL or AWS access credentials), or gateway URL. Your docker-compose file may already have predefined values for some of these, in which case do not overwrite them unless you are certain of what you're doing.
Docker networking works differently on Linux vs other operating systems, and you need to keep this in mind when
specifying values for things like MongoDB or gateway addresses. Under Linux, Docker containers and the host
operating system run in the same network host, so you can use localhost, for example, when telling a dockerized
Dataset microservice where it can reach the gateway (running natively or in a Docker container). Under other operating
systems, however, Docker containers run on a different network host, so you should instead use your local network IP -
using localhost will not reach your expected target.
Starting the microservice
For convenience, most microservices include a unix-based script that will run the Docker command that will start your microservice, along with the dependencies covered by Docker. The file name will vary from microservice to microservice, and the argument may also vary, but it's usually something along the lines of:
./dataset.sh develop
Mac users' mileage may vary with these scripts, and Windows users will need to manually open these file and reproduce the included logic in Windows-compatible syntax - don't worry, they are pretty simple and easy to understand.
Docker will take a few minutes to run, especially during the first execution, but once it's up and running, you should see the HTTP address where your microservice is available in the output printed to the console.
Running the tests
Running tests under Docker is similar to running the actual microservice. The easiest way to do so, for unix-based OSs
is using the included .sh helper file:
./dataset.sh test
Common errors and pitfalls
- Your microservice cannot connect to MongoDB/other database: this can happen with Docker setups if the database
container takes longer to start than the microservice container - which is common on first time executions. Re-run the
docker-compose command fixes it most times. Check if the address, port, username and password values on the
dev.envfile are correct - most of the time, the default values will work, and yourdev.envfile should not override them. - Your microservice crashes when handling an API call, trying to reach a network address: this may be your microservice trying to reach another microservice through the gateway. Make sure that both the gateway and the necessary dependent microservices are up and running, and that all microservices involved are registered in the gateway.
- Your microservice has user-related issues, even though you are providing a
Bearertoken: Bearer tokens are processed by theauthorizationmicroservice, which is reached through the gateway. Ensure both are up and running, and check their respective logs for more clues to what may be going wrong. - Your tests keep failing: This can be due to multiple reasons. Check the microservice's travis status (link in the README.md) to see if it's just you, or if there's an issue with the preexisting code base. Run your tests a few more times and see if the output is consistent - some tests are not deterministic, and have varying results.
Local gateway
As previously mentioned, microservices rely on each other to build complex responses or provide advanced functionality. They also rely on a dedicated microservice to validate user data, a scenario you'll probably run into often as you develop your own endpoints. When deployed on the cloud, the RW API uses AWS API Gateway to achieve this. However, when running microservices locally, using API Gateway is not feasible for multiple reasons, so instead you need to use an alternative.
Localstack aims to be a AWS drop-in replacement meant to be used in scenarios like the one above, where you want to have AWS equivalent functionality, but locally/offline.
There are multiple ways to run Localstack, covered in the respective documentation page. For simplicity, this guide will
assume you are using the standard docker setup which, at the time of writing, can be executed using the following:
docker run --rm -it -p 4566:4566 -p 4510-4559:4510-4559 localstack/localstack
This will run Localstack locally, and make it available through port 4566.
Once it's up, you now need to configure it to act as the "real" AWS API Gateway configuration for RW API would. To do this, you can use this Terraform project, which will effectively apply the same configuration that's present on the "real" AWS, but tweaked to work with Localstack.
It's important to note a few details about this:
- This configuration will try to reach all microservices on the same host (provided by you as a Terraform variable).
- Each microservice is expected to be running on a specific port. You will find a folder per
microservice in this folder.
Each folder will contain a
main.tffile, and in the first few lines of it, you will find the port in which you must expose that microservice. All ports are in the 30500+ range. - You only need to start the microservices that you plan on using - no need to start all of them.
CI/CD
The RW API uses multiple tools in it's CI and CD pipelines. All microservices that compose the RW API use a common set of tools:
- Github for version control and code repository.
- Travis CI for automatic test execution.
- Code Climate for code coverage monitoring.
- Jenkins for deployment.
We assume, at this point, that you're already familiar with Github and its core functionality, like branches and pull requests (PRs). If that's not the case, use your favourite search engine to learn more about those concepts.
Each microservice lives in a separate Github repository, most of which have Travis and Code Climate integrations
configured. Whenever a pull request is created, both tools will be triggered automatically - Travis will run the tests
included in the code, and notify the PR author of the result. Code Climate builds on top of that, and monitors and
reports code coverage. The behavior of both tools is controlled by a
single .travis.yml file you'll find in the root of each microservice's code base, and you can learn about it on each
of the tool's documentation page. You can see the result directly on the PR page.
When you want to submit a change to the code of one of the microservices, you should:
- Do your changes in a separate git branch, named after the change you're making.
- Target the
devbranch (ordevelop, ifdevdoes not exist yet - we're in the process of migrating to adev+staging+productionbranch structure, but haven't done so for all repos yet). - Include tests to cover the change you're making.
- Ensure your PR tests pass when executed by Travis.
- Maintain/increase the code coverage value reported by Code Climate.
- Briefly describe the changes you're doing in a
CHANGELOG.mdentry and, if these are public-facing, do a PR to the RW API documentation repository.
At this stage, and even if your tests pass locally, they may fail when executed in Travis. We recommend running them
again if this happens, to see if any hiccup occurred. If that's not
the case, look into the Travis logs to learn more. Unfortunately, the reasons for these are diverse. It can be related
to env vars defined inside the .travis.yml file, missing or incorrectly configured dependencies, differences in
packages between your local environment and Travis', etc. At the time of writing, and by default which can be
overridden, Travis uses Ubuntu and is configured to use native execution when
running tests, so using that very same approach locally may get you closer to the source of the problem you're
experiencing. Travis' output log will usually help you identify what's happening, and get you closer to a solution.
Once reviewed by a peer, your changes will be merged and will be ready for deployment to one of the live environments.
Currently, the RW API has 3 different environments:
devat https://aws-dev.resourcewatch.org for internal testing and development of new features. There are no guarantees of stability or data persistence. While it's not barred from public access, it's meant to be used only by developers working on the RW API code, for testing, debugging and experimentation.stagingat https://staging-api.resourcewatch.org/ is a more stable environment, meant to be used by both the RW API developers as well as other developers working on applications built using the RW API. It aims to be functionally stable, but occasional interruptions may occur if needed as part of a process, and code is sometimes in "release candidate" status, meaning it can have some issues. Data is often relied on by users of this API, so be mindful when performing destructive actions.productionat https://api.resourcewatch.org/ is meant to be as stable as possible, as it's used by real users.
Each microservice repository has a branch matching the name of each of these 3 environments, and changes will always go
from a feature branch to dev, then to staging, and finally to production. To push your changes across the
different environments, you should:
- Create a PR from the source branch to the target branch (from
devtostaging, or fromstagingtoproduction) - Deploy the code to the respective environment (we'll see how in a moment)
- Test it with actual calls to the API, to validate that no side effects were introduced.
Depending on the scale of the changes you're doing, it's recommended to
use git tags with semantic versioning. Also
be sure to update the CHANGELOG.md accordingly, and the package.json or equivalent files if they refer a version
number.
Changes being pushed to either production or staging should be announced in advance in the general channel in the
WRI API Slack (and to contact Ethan Roday if you're not in that Slack workspace). Specifically, for changes going
to production, that notice period should be of at least 14 days, during which said changes should be available
in staging for testing by everyone. In rare cases, if a hotfix is needed to fix a breaking change in production, the
14-day lead time can be circumvented, but an announcement still must be made.
It's also best practice to announce the changes you're about to deploy before doing so, so that other developers of RW API applications can be on the lookout for regressions, and can quickly get in touch with you should any undesired behavior change be detected.
Each of the referred environments lives on a separate Kubernetes cluster (hosted with AWS EKS), and deployment is done using individual Jenkins instances:
- Jenkins for the dev environment
- Jenkins for the staging environment
- Jenkins for the production environment
All 3 instances have similar overall configuration, but different microservices may deploy differently depending on the
behavior coded into the Jenkinsfile that's part of their source code - for example, some WRI sites are also deployed
using this approach, but opt to deploy both staging and production versions to the production cluster, and may not be
in the staging or dev Jenkins. However, the majority of services follow the convention of a single branch per
Jenkins instance, with the branch name matching the name of the respective environment.
The list of jobs you find on each Jenkins instance will match the list of services deployed on that environment. In the
details of each job, you should find a branch named after the environment, which corresponds to the Github branch with
the same name (some services may still have the old approach, with develop for dev and staging, and master
for production). You may also find other branches, or a different branch structure, depending on the service itself -
again, the Jenkinsfile configuration is king here, and you should refer to it to better understand what is the desired
behavior per branch. In some cases, old branches will be listed on Jenkins but should be ignored.
Deployments need to be triggered manually, on a per-microservice and per-branch basis. Once a deployment starts, Jenkins
will run the Jenkinsfile content - it is, after all, a script - and perform the actions contained in it. While it's up
to the maintainer of each microservice to modify this script, more often than not it will run the tests included in the
microservice, using Docker, and if these pass, push the newly generated Docker image
to Docker Hub. It will then update the respective Kubernetes cluster with content of the
matching subfolder inside the k8s folder of the microservice, plus the k8s/service folder if one exists. The last
step is to deploy the recently pushed Docker image from Docker Hub to the cluster, which will cause Kubernetes to
progressively replace running old instances of the service with ones based on the new version.
A couple of important notes here:
- All code deployed this way is made public through Docker Hub. If you have sensitive information in your codebase, and are using a Github private repository but are deploying using this approach, your information is NOT kept private.
- When deploying to production, most microservices will have an additional step at the end of the
Jenkinsfileexecution, which will require a human to explicitly click a link at the end of the Jenkins build log to trigger a deployment to the cluster. This is made intentionally so that deployment to the production environment are explicit and intentional, and are not triggered by accident.
While it's rare, tests ran by Jenkins at this stage may also fail, preventing your deployment. In these cases, refer to the Jenkins build log for details, which most of the times can be reproduced locally running your tests using Docker. If your Jenkins log mentions issues related with disk capacity or network address assignment problems, please reach out to someone with access to the Jenkins VMs and ask for a docker system prune.
Infrastructure configuration
While the workflow above will cover most of the changes you'll do as an RW API developer - changes to the code that powers the API - from time to time you'll need to adjust the actual infrastructure on which the API runs. This section covers what you need to know to be able to manage the infrastructure.
Infrastructure as code using Terraform
Each of the 3 RW API environments lives on a separate AWS account. To ease maintenance, the infrastructure configuration is shared by all 3 environments, and is maintained using a common Terraform project, an infrastructure as code tool. If you are not familiar with Terraform, we recommend learning about it before proceeding.
Structure-wise, the 3 RW API environments are mostly equal, with the differences between them being the following:
- Scale and redundancy: the production environment has more and more capable hardware, to account for higher user load and also to provide redundancy on key services
- Sites: due to its stability-oriented purpose, the production environment also hosts the sites for some WRI-related projects, which run in dedicated EKS node groups, and that do not exist on the dev or staging clusters.
- Availability: being a development-only resource, the dev environment does not necessarily need to be available 24/7, and it may be intentionally unavailable as a cost-saving measure - we call this hibernation.
Due to the structure of the RW API infrastructure, the final architecture is defined by 2 Terraform projects:
- The AWS Terraform project contains
lower level elements, like networking, a bastion host, Jenkins and an
AWS EKS Kubernetes cluster. This configuration is automatically applied to each AWS account
using Github Actions when merged to the respective branch. Github actions are
also used to run a
terraform planpreview of changes for each Pull Request. - The Kubernetes Terraform project
mostly contains the configuration for Kubernetes services, as well as some database-level services. Unlike the
previous, this Terraform project needs to be applied manually, using the
terraform applycommand.
The Kubernetes Terraform project relies on the resources provisioned by the AWS Terraform project (which is why they can't be merged into a single one), so be sure that they are applied in that order.
While the Kubernetes Terraform project contains an increasingly large portion of the overall Kubernetes configuration, there are some additional Kubernetes elements provisioned outside of it.
- Some resources are provisioned using
traditional YAML files, that need to be manually applied using
kubectl applyonce the Kubernetes cluster is up and running. The link above contains not only said YAML files, but also associated documentation. - Kubernetes secrets are kept in a separate, private repository. Said repository has multiple YAML files, and organized by cluster, and then by Kubernetes namespace. Each of these YAML files needs to be manually applied whenever needed.
RW API hibernation
As mentioned above, to save costs on the dev environment, its functionality may be turned off at times when it's not needed - we called this "hibernation". The goal is to have a way to dial down resources in times when they are not needed (which we anticipate will be most of the time), while also giving RW API developers a simple and easy way to restore full functionality in times when it's needed.
This can be achieved by modifying the hibernate boolean variable in
the Terraform dev variables file
and applying these changes (Github Actions will do this automatically on push/merge to the dev branch). Setting this
value to true will cause the dev RW API to go into hibernation and become unavailable, while false restore its
functionality. Keep in mind that both hibernation and restoration processes will take a few minutes, so we recommend the
company of your favourite beverage while you carry out these steps.
One important note here: while it's meant to be used with the dev environment only, there is no failsafe mechanism in place preventing the staging or production environments from being set into hibernation as well. When modifying the Terraform variables file, be sure you are on the correct file, otherwise you may accidentally cause staging or production unavailability.
Access to infrastructure resources
For management or debug purposes, you may need to access the infrastructure resources. Depending on what you want to achieve, there are multiple paths forward. However, for all of them, a common required element is an AWS account with the adequate permissions. These permissions will depend on what you're trying to achieve in particular. The AWS IAM permission mechanism is too powerful and complex to cover here, so be prepared to see a few "permission denied" from time to time, and to discuss with your fellow RW API developers what permissions you are missing that will allow you to access a give resource.
Infrastructure details
Infrastructure details are accessible in multiple ways, depending on exactly what you're looking for.
If you are looking for a high-level piece of information (like "how many CPUs are we running?"), you may use the AWS Console directly, as it provides a simple UI for a lot of information. Alternatively, investigating the Terraform files are a good way to learn about what services are configured overall, without having to browse every page of the AWS Console, or worry that you may be looking in the wrong AWS Region.
Finally, for very low level details, AWS has a CLI tool that may expose information not available through the channels mentioned above.
In all scenarios, if you are looking to permanently modify the infrastructure, keep in mind that the Terraform projects are kings here, and any change made using either the AWS Console or AWS CLI that is not persisted to Terraform should be considered ephemeral, as it may be overwritten at any time without prior warning. You may, however, modify the infrastructure using the AWS Console or AWS CLI as a means of experimentation, before projecting your final changes on Terraform.
Infrastructure access
Infrastructure access is often need as a way to access things like Kubernetes, database dumps, system status, etc. It's not an end in itself, but rather a necessary step to achieve other goals. To configure your infrastructure access, you'll need two elements.
The first of which is a running and configured AWS CLI tool installation. The AWS CLI tool has comprehensive documentation, which should also cover the install steps for your particular operating system. To configure it you'll also need the AWS account covered in the previous section.
The second element you'll need is access to the bastion host. If you are not familiar with bastion hosts, we recommend reading about it before proceeding but, in a nutshell, a bastion host works as a single point of entry into key parts of the infrastructure, which are otherwise inaccessible from the public internet. A way to contact a service running in the infrastructure from the outside world is creating an SSH tunnel that proxies traffic to that service through the bastion host, thus bypassing this restriction. For this to work, you need SSH access to the bastion host, which a fellow RW API developer may grant you.
shell script
ssh -N -L <local port>:<target service address>:<target service port> <bastion host user>@<bastion host address>
To create an SSH tunnel under a unix-based system, you'll need to run a command like the example here.
Database access
Access to databases (to extract a dump for testing, for example) depends on how said database service is configured. At the time of writing, some database services run as AWS managed services, while other live inside the Kubernetes cluster, as Kubernetes services.
For database services provided by AWS managed services, the only necessary steps are the ones covered previously on the Infrastructure access section. After that, you should be able to reach the host of the database service, per details provided by the service itself. You may also need authentication details for a specific service, which you may find either on the Terraform configuration, the Kubernetes secrets files or AWS secret storage.
For access to database services running as a Kubernetes service, you'll need Kubernetes access (which we will cover next). Once you have that configured, you should configure a Kubernetes port forward to map said service to a port of your local host. Access credentials are typically available on the Kubernetes secrets files.
Kubernetes access
The RW API runs in a AWS EKS Kubernetes cluster, which can be accessed using the kubectl command line tool, which you should install on your computer. You also need the elements previously covered in the Infrastructure access section, so be sure that your AWS CLI is installed and configured, and that you have a way to communicate with the infrastructure's inner elements.
To configure kubectl, you will need some details that are specific to the kubernetes cluster you're trying to access.
Said details are available as the output of the terraform apply command that's executed by Github Actions for
the AWS Terraform project. Be mindful
that, amongst those details, is the URL through which kubectl should contact the Kubernetes control plane. Given that
you are using an SSH tunnel, you should:
- Modify the Kubernetes URL in the
kubectlby adding a custom port value to it (say 4433, for the sake of example) - Modify the you local hosts file so that the Kubernetes URL is resolved to your 127.0.0.1 IP (or equivalent)
- Create a SSH tunnel that maps your local port (the 4433 from the example above) to the actual EKS URL and port, proxied through the bastion host.
ssh -N -L 4433:<EKS URL>:443 <bastion host user>@<bastion host URL>
Here's an example of how you could create said SSH tunnel:
Log access
Logs for the whole infrastructure are centralized in AWS Cloudwatch. Optionally, if you find it more convenient, you can
opt to use kubectl to access logs for a particular pod or container, but you'll also find that output on AWS
Cloudwatch.
Certain AWS managed services' logs will only be available on Cloudwatch, so we encourage you to learn how to navigate it.
Testing your changes
With your code live on one of the clusters, you should now proceed to testing it. The type of tests you should run vary greatly with the nature of the changes you did, so common sense and industry best practices apply here:
- The bigger the change, the broader the testing should be.
- Test your changes with different types of users,
applications, payloads, etc. - Try to break your code - send unexpected input, try to access resources you should not have access to, etc. More important than doing what it should is not doing what it shouldn't .
- If you can, ask for help - testing can be seen as an exercise in creativity, and having someone's assistance will help think outside the box.
- If you find a bug, fix it, and test everything again, not only what you just fixed.
- If a test is "simple", write it as a code test, which is reproducible. Save manual testing for the complex scenarios.
- Test the assumptions you used for behavior of other microservices - E2E testing mocks other microservices, so this may be the first time your code is running alongside real instances of other microservices.
- Clean up after your tests - if you created a bunch of test data, do your best to delete it once you're done. This is particularly important if you are testing something in the production environment, as that test data may be visible to real world users. Cleaning up in staging is also highly recommended.
If you are implementing a new endpoint and it's mission critical to the RW API or one of the applications it powers, you may want to add a API smoke test to ensure that any issue affecting its availability is detected and reported. Refer to that section of the docs for more details.
Microservice internal architecture - nodejs
Nodejs microservices are based on the Koa framework for nodejs. To understand the following code snippets, we assume you are familiar with the basics of the framework, like how routes are declared and handled, what middleware is, and how it works. You should also be somewhat familiar with tools like npm, mongo and mongoose, Jenkins CI, docker and docker-compose
Anatomy of a (nodejs) microservice
In this section, we'll use the dataset microservice as an example, but these concepts should apply to most if not all nodejs microservices:
- app: source code for the microservice functionality.
- config: configuration for different environments in which the microservice will be executed.
- k8s: kubernetes configuration.
- Jenkinsfile: deployment configuration for Jenkins CI.
- dataset.sh: convenience executable file (the name will always match the microservice).
- docker-compose-develop.yml: docker-compose configuration for develop environment.
- docker-compose-test.yml: docker-compose configuration for test environment.
- docker-compose.yml: docker-compose configuration for production environment.
- entrypoint.sh: docker entry point.
Since we are interested in the microservice's functional bits, we'll analyse the app folder content in more detail.
It's worth mentioning that, depending on how you run the microservice, the respective docker compose files may contain
relevant information and configuration, as do the files inside the config folder.
The app folder contains the following structure:
- src: source code for the microservice.
- test: test source code.
- Gruntfile.js: grunt task definition file.
- index.js: nodejs entry point.
The grunt file includes several task definition that may be useful during day-to-day development. However, grunt is
semi-deprecated (it's still needed, don't remove it) in the sense that it's recommended to define useful tasks in
the package.json file instead - those tasks will, in turn, call grunt tasks.
Inside the app/src folder you'll find the following structure. The folders below will be commonly found on all
microservice, unless stated otherwise:
- data: data files. This folder is specific to the dataset microservice.
- errors: error classes for specific scenarios, which then in turn translate into specific HTTP codes and responses.
- models:
mongosemodels to ease integration withmongo. - routes:
koaroute and request handling definition, as well as middleware. - serializers:
mongoogsemodel to JSON response serializers. - services: application business logic.
- validators: input validators.
- app.constants.js: microservice application constants.
- app.js:
koabootstrap, as well as basic error handling and gateway registration. - loader.js: convenience file that iterates over the nested content of the
routesfolder and loads files. - logger.js: convenience file that configures the logger for ease of use.
Adding a new endpoint
In this section we'll cover how you can add a new endpoint with new functionality to an existing microservice. The aim is not to be a comprehensive guide to cover all cases, but more of a quick entry point into day-to-day actions you may want to perform, which should be complemented by your own learning of how a microservice works - remember that all microservices, despite being structurally similar, have their own custom code and functionality.
To add a new endpoint, here's the short tasklist you have to tackle:
- Register your route in koa.
- Add a handler for that route.
- Add middleware for validation, if applicable.
- Implement new services, models or serializers to handle your application logic, if applicable.
- Add tests for your functionality (you may want to start with this, if TDD is your thing).
- Update the Infrastructure as code repository and deploy the updated configuration.
Register your route in koa
Route registration is done using the koa-router library, and can be done in
the app/src/routes/api/v1/dataset.router.js file, usually at the bottom of if:
// router object declaration, usually at the top of the file
const router = new Router({
  prefix: '/dataset',
});

// routes declaration, usually at the bottom of the file
router.get('/', DatasetRouter.getAll);
router.post('/find-by-ids', DatasetRouter.findByIds);
router.post('/', validationMiddleware, authorizationMiddleware, authorizationBigQuery, DatasetRouter.create);
// router.post('/', validationMiddleware, authorizationMiddleware, authorizationBigQuery, authorizationSubscribable, DatasetRouter.create);
router.post('/upload', validationMiddleware, authorizationMiddleware, DatasetRouter.upload);
router.post('/:dataset/flush', authorizationMiddleware, DatasetRouter.flushDataset);
router.post('/:dataset/recover', authorizationRecover, DatasetRouter.recover);

router.get('/:dataset', DatasetRouter.get);
router.get('/:dataset/verification', DatasetRouter.verification);
router.patch('/:dataset', validationMiddleware, authorizationMiddleware, DatasetRouter.update);
router.delete('/:dataset', authorizationMiddleware, DatasetRouter.delete);
router.post('/:dataset/clone', validationMiddleware, authorizationMiddleware, DatasetRouter.clone);
In here you'll find the already existing routes. As you can see from the rather explicit syntax, you need to call the
method that matches the desired HTTP verb on the router object, and pass it a variable number of arguments - more on
this in the next section. One thing to keep in mind is that all the routes in a file are typically prefixed, as defined
in the router object declaration.
RW API integration
While they could technically work as standalone applications, microservices are built from the ground up to work as part of a microservice-based application - the RW API. As such, the ecosystem provides each microservice with a few convenience feature that DRY certain aspects, such as:
- Requests to other RW API microservices.
- JWT tokens and API key parsing and handling.
- Fastly integration.
These 3 aspects can be handled by RW API integration libraries, that can be used as-is as part of the microservice development lifecycle. Currently, there are libraries for 3 development environments that support the latest RW API features:
- nodejs package for Koa v5.1.3 and later
- Python module for Flask v3.0.0 and later
- Rails engine
Due to the way in which the different development environments are structured, not all 3 libraries implement the 3 integration aspects previously identified. As this guide uses the nodejs environment, we'll cover the corresponding library, which does implement all 3, but you may need to manually add said functionality to your microservice if needed and not provided.
Integrating the library in your microservice
As with all libraries you add to your source code, be sure to read the README and follow the setup instructions in it.
Requests to other RW API microservices
Often, microservices need to communicate with each other to build complex responses or provide advanced functionality. As highlighted above, microservices don't need (nor should) communicate directly with each other, and instead rely on two key pieces of information to achieve said communication:
- The gateway URL (provided as a configuration value)
- The endpoint path (typically hardcoded in the microservice itself)
Your code can then call a known RW API endpoint using the following approach:
// Loading the details of a user by its id
// The API Key should be retrieved from the client application's request headers
const { RWAPIMicroservice } = require('rw-api-microservice-node');

const getUserById = async (userId, apiKey) => {
  const body = await RWAPIMicroservice.requestToMicroservice({
    uri: `/auth/user/${userId}`,
    method: 'GET',
    headers: {
      'x-api-key': apiKey,
    }
  });
  logger.debug('User by id', body.data);
  return body.data;
}
Refer to the integration library documentation for details on all arguments supported, including TypeScript type definitions.
JWT Token handling
RW API manages request authentication by using JWT tokens. When provided, these tokens are included in the headers of the request sent by the client application. Many RW API endpoints will provide different data or functionality depending on which user issued a request, so it's crucial that these tokens are validated and the corresponding user data loaded prior to the request being processed by the microservice.
To ease this process, the RW API integration library for nodejs includes a middleware that will detect said JWT token
and, if present, will validate it and load the associated user details. While this is fully transparent to you as a dev,
it's worth knowing that this is done internally by the library, by issuing a request to the authorization
microservice, which is responsible for managing user accounts. The actual implementation is very similar to
the Requests to other RW API microservices example in the previous section.
If the JWT token is valid, the user data will be available to you as part of the koa context object, without you having to look for it or explicitly load it. Depending on the HTTP request verb, it may be available as a query parameter, or as part of the request body. The following snippet illustrates a function that would handle both scenarios, and return the user object:
const getUser = (ctx) => {
  const { query, body } = ctx.request;
  let user = { ...(query.loggedUser ? JSON.parse(query.loggedUser) : {}), ...ctx.request.body.loggedUser };
  return user;
}
API key handling
The RW API uses API keys to identify client applications, and to provide them with access to the API. These API keys are required on most endpoints, and are provided by client applications as part of the request headers. The integration library will automatically intercept these headers and, if present, validate them. It will also use that data to generate analytical records of the incoming request, and the user and application associated with them. This is done automatically and transparently to you as a developer, so you don't have to worry about it, but it may be useful to learn about it, as it may help you debug issues.
You can optionally disable API key validation or analytics collection - see the integration library documentation for more details.
Fastly integration
Fastly is an HTTP cache that sites between the client applications and the actual infrastructure that hosts the RW API. It mostly works transparently to both API users and developers but, as a developer, you may want to tweak its behavior so that, for example, one of your endpoint's responses is cached more or less often.
This functionality builds on top of the existing HTTP caching functionality, so be sure to learn about that before proceeding.
It's worth always keeping in mind that, like with all HTTP caches, only non-authenticated, GET requests with 2xx or 3xx response codes are cached - everything else is ignored as passed as-is. By default, even the requests that match the above criteria are not cached, as caching must be explicitly enabled on a per-response basis.
You can control the caching policy applied to your responses using its headers. Specifically, you have headers to do so:
cache: Setting thecacheheader will tell the HTTP cache to cache your response. The value provided (space separated list of strings) will be the different keys associated with your cache entryuncache: You can set theuncacheon any non-GET, successful response. Like before, it accepts a space separated list of string values. When set, this will cause all cache keys associated with any of the provided values to be purged. This is useful, for example, as part of a DELETE request, when you want to invalidate any cached response that may have included the deleted element.
Using these headers, the RW API integration library will ensure Fastly behaves as you would expect.
Other considerations
In some scenarios, while developing, it's not practical to run all the microservices your logic depend on on your development computer. The Writing end-to-end tests section has some details about writing tests for your code, including how you can mock such calls, so you don't have to run the actual dependencies.
Docker
When deployed in a production environment, microservices will run in a Docker container. As a microservice developer, you should include in your microservice the necessary configuration to run your application inside a container. This is done using a Dockerfile, and you can use the Dataset microservice's Dockerfile as an example of how one of these files looks like for a nodejs based microservice.
Its worth noting that these container are set up in a way that allows using them to both run the microservice itself, or their tests. This will be useful further ahead when we review the testing approach you should use when writing microservices.
Data layer
Many microservices require the ability to store data to perform their function. The RW API has several data storage tools available to you, in case you need to store information to run your service.
Warning: microservices run on ephemeral containers managed by Kubernetes, and often in multiple parallel instances, so do not rely on storing data on the filesystem, unless you know there's something like a Kubernetes' persistent volume to back it up.
When accessing these tools, there are a few things you should keep in mind:
- Isolation is not guaranteed, meaning your microservice will have theoretical access to other microservice's data, and other microservices may access your data.
- Despite having access to it, you should not manipulate other microservice's data directly at the data layer, unless there's a clear agreement between the involved microservices.
- It's up to you to ensure logic level isolation of your data - for example, if you rely on an relational database, be sure to use a unique database name.
- Access to the data layer is only available within the RW API cluster, which is why not all data storage tools have authentication enabled.
Currently, the following data storage tools are available on the RW API cluster:
MongoDB v3.6
MongoDB is the most frequently used data storage tool, as it supports schema-less document storage, thus making it easy to setup and run. When using MongoDB, be sure to give your collection an unique name, to avoid conflicts
To see an example of how to use MongoDB on a real-world microservice, check out the Dataset microservice.
Postgres v9.6
Use Postgres if your application needs a relational database. Unlike other data storage tools, Postgres access to individual microservices is granted on a per-database basis.
To see an example of how to use Postgres on a real-world microservice, check out the Resource watch manager microservice (written in Ruby on Rails).
AWS Elasticsearch Service v7.7
Use AWS Elasticsearch Service (powered by Open Distro for Elasticsearch) for search optimization or heterogeneous data storage with quick access.
To see an example of how to use Elasticsearch on a real-world microservice, check out the Document dataset adapter microservice.
Redis v5.0
Redis is an in-memory data storage tool, and can also be used as a pub-sub messaging tool.
You can learn how to use Redis in your applications by looking at the code of the Subscriptions microservice.
Neo4J v2.0
Neo4J is a graph database used by Graph microservice to build complex associations between different RW API resources.
RabbitMQ v3.7
RabbitMQ is a message broker service, which is particularly useful when handling long, asynchronous operations. You can see an example of its usage on the Document microservice - Executor submodule code base.
Cloud services
Some microservices have data storage needs that are not covered by the applications described here (for example, file storage). In those scenarios, it's common to use cloud services (like AWS S3, for example), but do reach out to the broader RW API development team before implementing your solution.
HTTP caching
The RW API has a system-wide HTTP cache that you may use to cache your requests, improving scalability and response times. This cache is based on Fastly, and you can browse its documentation if you are looking for a specific detail on its behavior. For most common use cases, you just need to keep in mind the following:
- Verbs other than GET are not cached.
- Only responses with codes 200, 203, 300 and 410 are cached, and the default cache TTL is 3 days.
- GET responses for
/authendpoints are never cached. - GET responses for
/queryor/fieldsendpoints are cached for 2 days.
If you are using the nodejs RW API integration library, you can further tweak this behavior by using the Fastly integration.
Logging
An important part of microservice operation is logging events as it processes requests. Many errors are only triggered during staging and production server execution, and without proper logging, there isn't a way to identify how it can be reproduced, so it can then be fixed.
Common development languages often come with either built-in or 3rd party logging libraries than make logging easier to handle. Current nodejs microservices use Bunyan to manage logs, which eases managing log destinations (stdout, file, etc) and log levels. Other libraries, for nodejs and other languages, offer similar functionality.
For microservice staging and production logs, the output channels should be stdout and stderr, the standard output
streams you'll find on most OSs. When live, these, will seamlessly integrate with the infrastructure to which
microservices will be deployed, and will allow for cluster-wide logging.
const logger = require('logger');

logger.info('Validating Dataset Update');
The example above logs that the validation process for input data associated with a dataset updated has been started.
You'll notice that the info() function is called - this sets the logging level for this message. While different
logging tools implement different strategies to differentiate logs, most microservices uses these 4 levels:
debug: use this whenever anything happens, that may or may not be relevant to have logged on a daily basis, but rather as a opt-in development and debug tool.info: use this for high-level expected actions and output that you'd need to have available to you in case you need to investigate a production issue.warn: use this for situations where something unexpected happened, but that may not necessarily be irregular flows - for example, user originated errors.error: use this when the application failed and is no longer able to recover, or when an server-side error occurs.
A common issue some developers have concerns logging errors. It's not uncommon to find microservices where all types of
errors generate a error log entry. However, this actually produces a lot of noise, and make it hard to debug. Consider
the following two scenarios when attempting to load a dataset by id:
- The dataset microservice queries the database, and the database cannot find a dataset matching that id, and the microservice returns a 404 HTTP response.
- The dataset microservice queries the database, but the database is offline for whatever reason, and the microservice returns a 500 HTTP response.
Both cases are, indeed, errors. However, the first one is not an application error - the microservice behaved as it
should. In this scenario, logging this event should not involve an error level event, as nothing unexpected, from the
application's point of view, happened: a user asked for something that does not exist, and the microservice handled that
as it should.
On the second case, however, something really unexpected did happen - the microservice could not contact the database.
This is an application level error, as we assume that our databases are always available for to microservices. This is
an example scenario where a error logging line should be generated. Or, putting it in another way, only use errors
logging for situations where a RW API developer should look into it.
Another best practice we recommend for log management is using an application-wide configuration value to define the
logging level. This is prove extremely useful when you switch from your local development environment (where you may
prefer the debug logging level for maximum detail) to production (where warn or error may be more reasonable).
When using Bunyan, logging levels are
set per stream.
Many microservices integrate the Config library at this stage, allowing you to
have different values
for production, staging
or other environments. Config also allows you
to override selected values with a environment variable,
typically LOGGER_LEVEL, which you may use, for example, to temporarily override the logging level on a particular
environment without changing the predefined default values.
If you want to access your logging output for a microservice that's already deployed on either staging or production,
you'll need access to kubernetes logging UI or CLI.
Testing
Testing code is important. And, as the developer of a RW API microservice, it's your responsibility to ensure that your code is bug free and easily extendable in the future. That means it should ship with a set of tests that can ensure, now and in the future, that it does what it's supposed to do. And the best way to do that is through testing.
If you are developing a new microservice or endpoint, it's expected that you provide a complete test suit for your code. In many cases, existing microservices will be a valuable source of examples you can copy and adapt to your needs. On occasion, you'll need to changes to endpoints that are not yet covered by tests. In those scenarios, we ask that add at least the tests to cover your modification. If you are feeling generous, and want to add tests that cover the endpoint's full functionality, you'll have our gratitude - test coverage for the RW API's endpoints is a work in progress, and not all endpoints have been reached just yet.
Writing end-to-end tests
Most microservices rely, to varying degrees, on end-to-end tests. In the context of an HTTP based microservice, this means that tests are responsible for issuing an HTTP request to a running instance of your microservice, getting the response and validating its content. Tests should also handle things like mocking resources and isolation from outside world - we'll get to these in a moment.
Example of a test from the dataset microservice
it('Create a JSON dataset with data in the body should be successful', async () => {
  const timestamp = new Date();
  const dataset = {
    name: `JSON Dataset - ${timestamp.getTime()}`,
    application: ['forest-atlas', 'rw'],
    applicationConfig: {
      'forest-atlas': {
        foo: 'bar',
      },
      rw: {
        foo: 'bar',
      }
    },
    connectorType: 'document',
    env: 'production',
    provider: 'json',
    dataPath: 'data',
    dataLastUpdated: timestamp.toISOString(),
    data: {
      data: [
        {
          a: 1,
          b: 2
        },
        {
          a: 2,
          b: 1
        },
      ]
    }
  };

  nock(process.env.GATEWAY_URL)
    .post('/v1/doc-datasets/json', (request) => {
      request.should.have.property('connector').and.be.an('object');
      const requestDataset = request.connector;

      requestDataset.should.have.property('name').and.equal(dataset.name);
      requestDataset.should.have.property('connectorType').and.equal(dataset.connectorType);
      requestDataset.should.have.property('application').and.eql(dataset.application);
      requestDataset.should.have.property('data').and.deep.equal(dataset.data);
      requestDataset.should.have.property('sources').and.eql([]);
      requestDataset.should.not.have.property('connectorUrl');

      return true;
    })
    .reply(200, {
      status: 200,
      detail: 'Ok'
    });

  const response = await requester.post(`/api/v1/dataset`).send({
    dataset,
    loggedUser: USERS.ADMIN
  });
  const createdDataset = deserializeDataset(response);

  response.status.should.equal(200);
  response.body.should.have.property('data').and.be.an('object');
  createdDataset.should.have.property('name').and.equal(`JSON Dataset - ${timestamp.getTime()}`);
  createdDataset.should.have.property('connectorType').and.equal('document');
  createdDataset.should.have.property('provider').and.equal('json');
  createdDataset.should.have.property('connectorUrl').and.equal(null);
  createdDataset.should.have.property('tableName');
  createdDataset.should.have.property('userId').and.equal(USERS.ADMIN.id);
  createdDataset.should.have.property('status').and.equal('pending');
  createdDataset.should.have.property('overwrite').and.equal(false);
  createdDataset.should.have.property('applicationConfig').and.deep.equal(dataset.applicationConfig);
  createdDataset.should.have.property('dataLastUpdated').and.equal(timestamp.toISOString());
  createdDataset.legend.should.be.an.instanceOf(Object);
  createdDataset.clonedHost.should.be.an.instanceOf(Object);
});
Current nodejs based microservices rely on Chai and Mocha as testing libraries, and this code example shows one of the tests that validate the dataset creation process. The code block is relatively large, but the logic is simple:
- We craft a JSON object with the content of the HTTP POST body
- As this endpoint needs to make a call to another microservice (through the gateway), we
use Nock to mock that POST request to the
/v1/doc-datasets/jsonendpoint. This way, your tests won't require actual running instances of the gateway or other microservices to run. - We send the our previously crafted POST request to a running instance of our dataset microservice, along with
a
loggedUserspoof data. - We get the HTTP response, process it for easier handling, and proceed to validate that it's content is as expected.
Different microservices and endpoint will have different requirements when it comes to testing, but the great majority of endpoints can be tested using simple variations of these steps. There are some additional considerations you should take into account when testing:
- The example above creates an actual dataset, meaning a MongoDB (or equivalent mocks) need to exist. For MongoDB specifically, our approach so far has been to use a real MongoDB instance, and running the tests on a separate database (´dataset-tests´ for example), aiming for isolation. Other microservices (for example, those relying on Elasticsearch) use mocks instead. Mocking usually leads to faster execution times, but can be troublesome to properly code. Use whichever alternative is best for you, and refer to the Data layer section for examples of microservices that use (and test with) different tools.
- Nock has a feature that blocks all HTTP requests, which is useful to ensure your code or tests are not relying on an external service without you being aware - just be sure to whitelist your own IP, otherwise the HTTP call your test makes to your microservice will fail too.
- Tests must be idempotent, and execute without assuming order. For example, running a test that first tests an insert, and then using the inserted element to test a delete would be a bad practice. Instead, your insert test should clean up its data once it's done, and the delete test should prepopulate the database before actually trying to delete it. A corollary of this is that you should be able to run your tests multiple times, back-to-back, without that affecting the results.
Test coverage metrics
While not required, most microservices use code coverage tools to evaluate how much of your code base is actually being checked when the test suite is executed. Nodejs based microservices frequently use NYC and Istanbul for this purpose, in case you are looking for a recommendation.
Running your tests using docker compose
The previous section covers an example of how a test looks like. Depending on your microservice technology stack, you have different ways of running your tests - in the case of the Dataset microservice, tests are executed using yarn.
However, to standardise test execution, you should also create a docker compose file that runs your tests (and their dependencies). This docker compose configuration should use the existing docker file set up previously, unless that's not possible.
Here's an example of one of these files. These will be particularly useful down the line, but also convenient for running tests locally.
For convenience, microservices commonly have a one line CLI command that allows running tests using the docker compose configuration you provide. These are particularly useful for other developers to run your tests without having to manually set up the associated dependencies.
CI/CD, Travis and Code Climate
Assuming you are hosting your microservice code on a service like Github, then you may benefit from its integration with CI/CD tools. There are multiple options in this space, and they mostly offer the same core functionality, but our preference so far has been to use Travis. In a nutshell, you can configure Travis to run your tests every time you push a new commit to a Github pull request. Tests will run on Travis' servers, and if they fail, you will get a message on your pull request warning you about this.
For full details on Travis and its features, how to configure it, what alternatives are there, and their pros and cons, please refer to your favourite search engine. If you are just want the basic, "it just works" configuration, this file from the Dataset microservice will have most of what you'll need.
Apart from running your tests, Travis also integrates with a service called Code Climate which analyses your code and looks for potentially problematic bits and suggests you fix them. More often than not, we just rely on another functionality offered by Code Climate - code coverage. This allows you to easily monitor how your pull request influences code coverage - for example, you can set up an alarm that warns you in case your pull request decreases your code coverage, which may indicate that you added more code than you tested.
Most microservices will display a test status and code coverage badges on their README, as a way to display if the tests are passing, and a rough estimation of how broad the test coverage is.
Smoke testing
Besides the test tools covered above, which are used to validate that your code changes work as designed, there is also a smoke test tool in place, that periodically issues a request to selected RW API endpoints and validates that the response match an expected preconfigured value. These tests are not used to validate functionality, but rather availability - if something goes wrong, a human is notified that the RW API is not working as it should, and that this is potentially affecting users.
If you believe your microservice implements a mission-critical endpoint that would merit one of these tests, please reach out to the RW API team.
Deploying your microservice
Jenkins
Microservice deployment to the Kubernetes clusters is done using Jenkins. The actual deployment process is configurable using a Jenkinsfile script written in Groovy. Most microservices use the same file, as the logic in it is flexible enough to accommodate most scenarios.
In a nutshell, this Jenkinsfile will:
- Build a docker image using the Docker file contained in your microservice.
- Uses the included docker compose configuration to run your tests. If the tests fail, the process is aborted at this stage
- Push the generated docker image to dockerhub
- Depending on the git branch and the Jenkinsfile content, some of the following actions may take place:
- If deploying from the
devbranch, it will push the docker image to the dev kubernetes cluster - If deploying from the
developorstagingbranches, it will push the docker image to the staging kubernetes cluster - If deploying from the
masterorproductionbranches branch, you will get a confirmation input. If you confirm, it will push the docker image to the production kubernetes cluster - Any other branches are ignored.
- If deploying from the
A note on branches: an old branching scheme you may still find on some microservices relied on master + develop
branches, but it's gradually being replaced by a scheme that uses dev, staging and production. All repos use one
scheme or the other, but not both simultaneously, and the Jenkinsfile will reflect that.
At the beginning of each deploy process, you may also see an confirmation input that, if accepted, will redeploy the
kubernetes configuration contained in the microservice code repository to the respective kubernetes cluster: develop
branch to the staging cluster, master branch to the production cluster.
One thing worth noting is that the docker images generated using this method are publicly available on dockerhub. Be careful not to store any sensitive data in them, as it will be available to anyone.
Getting access to Jenkins
Each environment (dev, staging, production) has its own Jenkins server:
- Jenkins for the dev environment
- Jenkins for the staging environment
- Jenkins for the production environment
If you need an account in one of these environments (for example to approve a deployment in production), contact ethan.roday@wri.org.
Kubernetes configuration
Most microservice have a Kubernetes configuration folder, typically containing 3 folders:
productioncontains files that will be applied when deploying themasterbranch to the production clusterstagingcontains files that will be applied when deploying thedevelopbranch to the production clusterservicescontains files that will be applied when deploying either branches to their respective cluster.
Note that these settings are only applied if you opt in to it, by interacting with the input request that is displayed on Jenkins at the very beginning of the deployment process.
Documentation
README
Here are some 'do' and 'do not' you should take into account when writing the README.md for your microservice.
Do:
- Add the name of your microservice, along with a high level, short description of what it does.
- Identify the technical dependencies. This should include:
- Programming language
- Main framework or language-specific tools used
- Data layer dependencies or other applications, including version numbers
- Dependencies on other microservices
- Describe how to get your microservice up and running for development purposes (at least for the operating system you are currently using, but you get extra "thank you"s if you add details for other OSs)
- Describe how to run your tests
- Describe if and which configuration variables exist, and their behavior.
- Document implementation details, software development architectural decisions, etc
- Use English.
Do not:
- Document in detail how to set up dependencies on 3rd party applications (for example, don't provide installation instruction for a database server, just mention it's a dependency, and assume your fellow developer will figure out how to set it up on their system).
- Include a license text - you may mention it, but add the actual text on a separate file, to keep the README file concise.
- Assume the reader has vast experience in developing for the RW API, in the language your microservice is coded on, or using its dependencies or libraries
- Document endpoint behavior - that goes elsewhere.
Overall, the README should be targeted at developers that may need to run, test and debug your code.
Functional documentation
Documentation describing the business logic implemented by your microservice should go in the RW API reference documentation page. The documentation is available on this Github repository and its README includes instructions on how to use it and contribute.
Documentation is a key component of a successful API, so when altering public-facing behavior on the RW API, you must update the documentation accordingly, so that RW API users out there can be aware of the changes you made.
Code styling
As a way to help RW API developers collaborate, most microservices include a linter tool and ruleset to promote, as much as possible, a common set of rules for the way code is structured.
For microservices written in nodejs, this is achieved using Eslint with this configuration file.
For ruby-based microservices, you can use Rubocop along with this configuration file.
Most microservices will also include a .editorconfig file - you can learn more about there here.
Microservice reference
This document should give developers a bird's eye view of existing microservices, their status and resources, organized by namespace.
Core
| Name | URL | Travis Status | Code Coverage |
|---|---|---|---|
| arcgis | Github |  |
|
| bigquery | Github |  |
|
| carto | Github |  |
|
| converter | Github |  |
|
| dataset | Github |  |
|
| doc-executor | Github |  |
|
| doc-orchestrator | Github |  |
|
| doc-writer | Github |  |
|
| document | Github |  |
|
| fires summary | Github |  |
|
| gee | Github |  |
|
| gfw | Github |  |
|
| gee-tiles | Github |  |
|
| geostore | Github |  |
|
| graph-client | Github |  |
|
| layer | Github |  |
|
| metadata | Github |  |
|
| Github |  |
||
| query | Github |  |
|
| rw-lp | Github | ||
| task-async | Github | ||
| vocabulary | Github |  |
|
| webshot | Github |  |
|
| widget | Github |  |
GFW
| Name | URL | Travis Status | Code Coverage |
|---|---|---|---|
| analysis-gee | Github |  |
|
| arcgis-proxy | Github |  |
|
| area | Github |  |
|
| forest-change | Github |  |
|
| gfw-forma | Github |  |
|
| gfw-guira | Github |  |
|
| gfw-ogr | Github |  |
|
| gfw-prodes | Github |  |
|
| gfw-umd | Github |  |
|
| gfw-user | Github |  |
|
| gs-pro-config | Github |  |
|
| glad-analysis-athena | Github |  |
|
| high-res | Github |  |
|
| imazon | Github |  |
|
| quicc | Github |  |
|
| story | Github |  |
|
| subscriptions | Github |  |
|
| true-color-tiles | Github |  |
|
| viirs-fires | Github |  |
Aqueduct
| Name | URL | Travis Status | Code Coverage |
|---|---|---|---|
| aqueduct-analysis | Github |  |
PREP
| Name | URL | Travis Status | Code Coverage |
|---|---|---|---|
| nexgddp | Github |  |
|
| prep-api | Github |  |
|
| prep-app | Github | ||
| prep-manager | Github | ||
| proxy | Github |  |
Climate Watch
| Name | URL | Travis Status | Code Coverage |
|---|---|---|---|
| Climate Watch Flagship | Github | ||
| Climate Watch India Platform | Github | ||
| Climate Watch Indonesia Platform | Github | ||
| Climate Watch South Africa Platform | Github | ||
| Climate Watch: Emissions Scenario Portal | Github |
RW
| Name | URL | Travis Status | Code Coverage |
|---|---|---|---|
| resource-watch-manager | Github |  |
API Smoke Tests
This chapter covers the existing API Smoke Tests, including instructions on how to manage existing tests and create new ones.
The API Smoke Tests are implemented using Canaries provided by AWS Synthetics (docs here).
Template for smoke tests
Template for an AWS Synthetics Canary
const synthetics = require('Synthetics');
const log = require('SyntheticsLogger');
const AWS = require('aws-sdk');
const https = require('https');
const http = require('http');

const apiCanaryBlueprint = async function () {

  const verifyRequest = async function (requestOption, body = null) {
    return new Promise((resolve, reject) => {
      // Prep request
      log.info("Making request with options: " + JSON.stringify(requestOption));
      let req = (requestOption.port === 443) ? https.request(requestOption) : http.request(requestOption);

      // POST body data
      if (body) { req.write(JSON.stringify(body)); }

      // Handle response
      req.on('response', (res) => {
        log.info(`Status Code: ${res.statusCode}`)

        // Assert the status code returned
        if (res.statusCode !== 200) {
          reject("Failed: " + requestOption.path + " with status code " + res.statusCode);
        }

        // Grab body chunks and piece returned body together
        let body = '';
        res.on('data', (chunk) => { body += chunk.toString(); });

        // Resolve providing the returned body
        res.on('end', () => resolve(JSON.parse(body)));
      });

      // Reject on error
      req.on('error', (error) => reject(error));
      req.end();
    });
  }

  // Build request options
  let requestOptions = {
    hostname: "api.resourcewatch.org",
    method: "GET",
    path: "/v1/dataset",
    port: 443,
    headers: {
      'User-Agent': synthetics.getCanaryUserAgentString(),
      'Content-Type': 'application/json',
    },
  };

  // Find and use secret for auth token
  const secretsManager = new AWS.SecretsManager();
  await secretsManager.getSecretValue({ SecretId: "gfw-api/token" }, function(err, data) {
    if (err) log.info(err, err.stack);
    log.info(data);
    requestOptions.headers['Authorization'] = "Bearer " + JSON.parse(data["SecretString"])["token"];
  }).promise();

  // Find and use secret for hostname
  await secretsManager.getSecretValue({ SecretId: "wri-api/smoke-tests-host" }, function(err, data) {
    if (err) log.info(err, err.stack);
    log.info(data);
    requestOptions.hostname = JSON.parse(data["SecretString"])["smoke-tests-host"];
  }).promise();

  const body = await verifyRequest(requestOptions);
  const id = body.data[0].id;

  // Change needed request options
  requestOptions.method = "GET";
  requestOptions.path = "/v1/dataset/"+id;

  // Make second request
  await verifyRequest(requestOptions);
};

exports.handler = async () => {
  return await apiCanaryBlueprint();
};
New tests should be based on the template displayed on the side, in order to take advantage of the configurations already in place.
Tests can execute multiple requests, but please minimize the number of interactions with databases to avoid creating junk data (for this reason, smoke testing POST, PATCH and DELETE endpoints is not recommended).
Another thing to notice is the usage of AWS secrets for storing a token to execute the request (gfw-api/token), as well as the hostname where the test will be executed (wri-api/smoke-tests-host).
The template on the side executes a GET request to /v1/dataset, grabs the first ID in the response data and executes a second GET request to the /v1/dataset/:id endpoint.
The test will pass if there are no exceptions thrown or promise rejections during the execution of the test. For the example on the side, the test will fail if any of the requests performed returns a status code that is not 200.
Things to pay attention
Use a user to run the tests
Please ensure that all tests are ran using a token for a user which was specifically created for running the tests. Also, it goes without saying, please don't share either the token or the credentials for the user running the tests with anyone.
Always configure alarms for the smoke tests
Smoke tests by default are created without an associated alarm. When managing or creating smoke tests, please ensure that each test has a unique alarm associated to it.
Also, please ensure that the created alarm has an action defined to notify someone in case of failure of a test.
Running smoke tests locally
Step 5 (before):
exports.handler = async () => {
  return await apiCanaryBlueprint();
};
Step 5 (after):
apiCanaryBlueprint();
In order to run smoke tests on your local machine for testing the script, some modifications need to be done:
- Copy the smoke test script into a file in your local machine (in this case, we're going to assume the name the file as
index.js). - Comment out any references to the
SyntheticsNPM package, which is only available for internal usage in the canary script. - Replace all
log.inforeferences (or any other method of thelogpackage) withconsole.logand comment out the usage of theSyntheticsLoggerNPM package. - Comment out references to the usage of AWS secrets and to the
aws-sdkNPM package. - Replace the last lines of the script (see on the side).
After these changes, you should be able to run the script locally using node index.js. Remember that any exception or error thrown will cause the test to fail, otherwise the test will be considered a pass. If you want to explicitly fail the test if some assertion is not valid, you can throw a new Error with a message for debugging.
Before updating the script once again in AWS Synthetics, don't forget to revert ALL the changes (just follow the steps in the reverse order).
Query transformations
While the WRI API aims to make the query interface as broad and transparent as possible, some of the querying options described below will not be available for specific dataset providers, depending on this API's implementation or limitations on the actual data provider's side.
Additionally to provider-specific limitations, every SQL query is transformed
by the sql2json microservice, also maintained
as NPM package. There is a first conversion from SQL to JSON, and then from
JSON to a SQL syntax that is compatible
with Open Distro for Elasticsearch SQL syntax.
You can read more about the limitations of using SQL with Elasticsearch here.
Areas v2 Notification Emails
Areas v2 services rely on email notifications to update users about the status of their areas. Specifically, when creating an area, updating an area, or when an ADMIN updates multiple areas by their geostore ids:
- If the area has status
pending, an email is sent to let the user know the area of interest is being generated and will be available later. - If the area has status
saved, an email is sent to let the user know the area of interest is ready to be viewed.
Interacting with Sparkpost for building email templates
Emails are sent using the Sparkpost API. For the emails to be sent, there must exist templates in Sparkpost ready to be sent, taking into account the different languages supported by the Areas service:
For the email sent to users when the Area of Interest is ready to be viewed, there should exist the following email templates on Sparkpost:
dashboard-complete-zh(Mandarin)dashboard-complete-pt-br(Brazilian Portuguese)dashboard-complete-id(Indonesian)dashboard-complete-fr(French)dashboard-complete-es-mx(Spanish)dashboard-complete-en(English)
For the email sent to users when the Area of Interest is being generated, there should exist the following email templates on Sparkpost:
dashboard-pending-zh(Mandarin)dashboard-pending-pt-br(Brazilian Portuguese)dashboard-pending-id(Indonesian)dashboard-pending-fr(French)dashboard-pending-es-mx(Spanish)dashboard-pending-en(English)
In order to build your templates on Sparkpost, you need to have access to WRI's Sparkpost account - for that, please reach out to a member of WRI in order to be granted access.
When building the actual templates, you can use variable interpolation to customize the emails sent taking into account the area that is being processed/has been processed. While building the dashboard-pending-* or dashboard-complete-* emails, the following variables are provided and can be used in the construction of the email body:
id: the ID of the area.name: the name of the area.location: an alias for the name of the area (contains the same as thenameparameter).subscriptions_url: the URL for managing areas of interest in the flagship application (example: https://globalforestwatch.org/my-gfw).dashboard_link: the URL for the area dashboard (example: https://globalforestwatch.org/dashboards/aoi/:areaId).map_link: the "view on map" URL for this area (example: https://globalforestwatch.org/map/aoi/:areaId).image_url: the URL for the image associated with the area.tags: a string containing the AOI tags, comma-separated.
Subscriptions
When communicating with the Subscriptions microservice from other microservices, you have access to special actions that are not available when using the public API. This section concerns subscriptions endpoints that offer special functionality when handling requests from other microservices.
Creating a subscription for another user
Creating a subscription for user with ID 123 - only works when called by other MS!
curl -X POST https://api.resourcewatch.org/v1/subscriptions \
-H "Authorization: Bearer <your-token>" \
-H "x-api-key: <your-api-key>" \
-H "Content-Type: application/json"  -d \
 '{
    "name": "<name>",
    "datasets": ["<dataset>"],
    "params": { "geostore": "35a6d982388ee5c4e141c2bceac3fb72" },
    "datasetsQuery": [
        {
            "id": ":subscription_dataset_id",
            "type": "test_subscription",
            "threshold": 1
        }
    ],
    "application": "rw",
    "language": "en",
    "env": <environment>,
    "resource": { "type": "EMAIL", "content": "email@address.com" },
    "userId": "123"
}'
You can create a subscription for another user by providing the user id in the body of the request.
This can only be done when performing requests from another microservice.
| Field | Description | Type | Required |
|---|---|---|---|
| userId | Id of the owner of the subscription - if not provided, it's set as the id of the user in the token. | String | No |
Updating a subscription for another user
If the request comes from another microservice, then it is possible to modify subscriptions belonging to other users. Otherwise, you can only modify subscriptions if you are the owner of the subscription.
The following fields are available to be provided when modifying a subscription:
| Field | Description | Type | Required |
|---|---|---|---|
| userId | Check here for more info | String | No |
Finding subscriptions by ids
curl -X POST https://api.resourcewatch.org/v1/subscriptions/find-by-ids \
-H "Authorization: Bearer <your-token>" \
-H "x-api-key: <your-api-key>"
-H "Content-Type: application/json"  -d \
 '{ "ids": ["5e4d273dce77c53768bc24f9"] }'
Example response:
{
    "data": [
        {
            "type": "subscription",
            "id": "5e4d273dce77c53768bc24f9",
            "attributes": {
                "createdAt": "2020-02-19T12:17:01.176Z",
                "userId": "5e2f0eaf9de40a6c87dd9b7d",
                "resource": {
                    "type": "EMAIL",
                    "content": "henrique.pacheco@vizzuality.com"
                },
                "datasets": [
                    "20cc5eca-8c63-4c41-8e8e-134dcf1e6d76"
                ],
                "params": {},
                "confirmed": false,
                "language": "en",
                "datasetsQuery": [
                    {
                        "threshold": 1,
                        "lastSentDate": "2020-02-19T12:17:01.175Z",
                        "historical": [],
                        "id": "20cc5eca-8c63-4c41-8e8e-134dcf1e6d76",
                        "type": "COUNT"
                    }
                ],
                "env": "production"
            }
        }
    ]
}
You can find a set of subscriptions given their ids using the following endpoint.
Finding subscriptions for a given user
curl -X POST https://api.resourcewatch.org/v1/subscriptions/user/5e2f0eaf9de40a6c87dd9b7d \
-H "Authorization: Bearer <your-token>" \
-H "x-api-key: <your-api-key>"
Example response:
{
    "data": [
        {
            "type": "subscription",
            "id": "5e4d273dce77c53768bc24f9",
            "attributes": {
                "createdAt": "2020-02-19T12:17:01.176Z",
                "userId": "5e2f0eaf9de40a6c87dd9b7d",
                "resource": {
                    "type": "EMAIL",
                    "content": "henrique.pacheco@vizzuality.com"
                },
                "datasets": [
                    "20cc5eca-8c63-4c41-8e8e-134dcf1e6d76"
                ],
                "params": {},
                "confirmed": false,
                "language": "en",
                "datasetsQuery": [
                    {
                        "threshold": 1,
                        "lastSentDate": "2020-02-19T12:17:01.175Z",
                        "historical": [],
                        "id": "20cc5eca-8c63-4c41-8e8e-134dcf1e6d76",
                        "type": "COUNT"
                    }
                ],
                "env": "production"
            }
        }
    ]
}
You can find all the subscriptions associated with a given user id using the following endpoint.
This endpoint supports the following optional query parameters as filters:
| Field | Description | Type |
|---|---|---|
| application | Application to which the subscription is associated. Read more about the application field here. |
String |
| env | Environment to which the subscription is associated. Read more about this field in the Environments concept section. | String |
Finding all subscriptions
curl -X GET https://api.resourcewatch.org/v1/subscriptions/find-all \
-H "Authorization: Bearer <your-token>" \
-H "x-api-key: <your-api-key>"
Example response:
{
    "data": [
        {
            "type": "subscription",
            "id": "57bc7f9bb67c5da7720babc3",
            "attributes": {
                "name": null,
                "createdAt": "2019-10-09T06:17:54.098Z",
                "userId": "57bc2631f077ce98007988f9",
                "resource": {
                    "type": "EMAIL",
                    "content": "your.email@resourcewatch.org"
                },
                "datasets": [
                    "umd-loss-gain"
                ],
                "params": {
                    "geostore": "d3015d189631c8e2acddda9a547260c4"
                },
                "confirmed": true,
                "language": "en",
                "datasetsQuery": [],
                "env": "production"
            }
        }
    ],
    "links": {
        "self": "https://api.resourcewatch.org/v1/subscriptions/find-all?page[number]=1&page[size]=10",
        "first": "https://api.resourcewatch.org/v1/subscriptions/find-all?page[number]=1&page[size]=10",
        "last": "https://api.resourcewatch.org/v1/subscriptions/find-all?page[number]=1&page[size]=10",
        "prev": "https://api.resourcewatch.org/v1/subscriptions/find-all?page[number]=1&page[size]=10",
        "next": "https://api.resourcewatch.org/v1/subscriptions/find-all?page[number]=1&page[size]=10"
    },
    "meta": {
        "total-pages": 1,
        "total-items": 1,
        "size": 10
    }
}
You can find all the subscriptions using the following endpoint.
This endpoint supports the following optional query parameters as filters:
| Field | Description | Type | Example |
|---|---|---|---|
| application | Application to which the subscription is associated. Read more about the application field here. |
String | 'rw' |
| env | Environment to which the subscription is associated. Read more about this field in the Environments concept section. | String | 'production' |
| updatedAtSince | Filter returned subscriptions by the updatedAt date being before the date provided. Should be a valid ISO date string. | String | '2020-03-25T09:16:22.068Z' |
| updatedAtUntil | Filter returned subscriptions by the updatedAt date being after the date provided. Should be a valid ISO date string. | String | '2020-03-25T09:16:22.068Z' |
| page[size] | The number elements per page. The maximum allowed value is 100 and the default value is 10. | Number | 10 |
| page[number] | The page to fetch. Defaults to 1. | Number | 1 |
Testing a subscription
curl -X POST 'http://api.resourcewatch.org/v1/subscriptions/test-alert' \
-H "Authorization: Bearer <your-token>" \
-H "x-api-key: <your-api-key>"
--data-raw '{
    "subId": "12345ae0895047001a1d0391",
    "alert": "viirs-active-fires"
}'
Example response:
{
  "success": true
}
This endpoints will, for a single subscription and alert type, run the pipeline that checks for data updates and issues the corresponding subscription notification email or webhook callback. This process has no impact on the regularly scheduled alert email processing.
The endpoint requires two parameters:
- subId: The ID of the subscription to test.
- alert: the type of the alert to process for the given subscription.
With these two values, the endpoint will run the data processing pipeline and issue the associated action (send an email or call the webhook). Like a standard subscription pipeline processing, should this produce no results, no email/webhook will be triggered.
The following values can be optionally passed in the request body:
| Field | Description | Default value |
|---|---|---|
| type | If specified, overrides the subscription type. This is not persisted. Can be URL or EMAIL. |
The type present in the subscription. |
| url | URL (including protocol) used for the URL type subscriptions. |
The url present in the subscription |
Address to which the subscription email will be sent on EMAIL type subscriptions. |
The email address present in the subscription | |
| fromDate | Start date from which to query for data updates. Example format: "2022-05-17" | One week ago from current date |
| toDate | End date until which to query for data updates. Example format: "2022-05-17" | Current date |
| language | Language in which to send the email. | English |
Using these parameters, you can specify a custom email address or callback URL for test, and even modify the subscription type (for example, issue an email for a subscription that would normally call a webhook, or vice-versa). None of these changes are persisted to the subscription, which will retain its preexisting type and email address/callback URL.
Errors for testing a subscription
| Error code | Error message | Description |
|---|---|---|
| 400 | Subscription id is required | The subId subscription id value is missing from the POST request body. |
| 400 | The alert provided is not supported for testing. Supported alerts: |
The provided alert value is not supported. |
| 400 | The alert type provided is not supported. Supported alerts types: |
The provided type value is not supported. |
| 401 | Unauthorized | You need to be logged in to use this endpoint. |
| 403 | Not authorized | You need to have the ADMIN role to use this endpoint. |
This endpoint is lacking error handling on a few common scenarios, in which situations it will reply with a success message, but internally fail silently:
- In case the subscription alert type is modified but the corresponding email/url is not provided
- In case the email/url are invalid (either the provided override value, or the preexisting one in the subscription)
- In case you provide a subId that is invalid or otherwise does not match an actual existing subscription.
User Management
When communicating with the Authorization microservice from other microservices, you have access to additional endpoints that are not available when using the public API. This section details these endpoints.
Finding users by ids
curl -X POST https://api.resourcewatch.org/auth/user/find-by-ids \
-H "Authorization: Bearer <your-token>" \
-H "x-api-key: <your-api-key>" \
-H "Content-Type: application/json" \
-d '{ "ids": ["5e4d273dce77c53768bc24f9"] }'
Example response:
{
    "data": [
        {
            "id": "5e4d273dce77c53768bc24f9",
            "_id": "5e4d273dce77c53768bc24f9",
            "email": "your@email.com",
            "name": "",
            "createdAt": "2021-03-24T09:19:25.000Z",
            "updatedAt": "2021-03-26T09:54:08.000Z",
            "role": "USER",
            "provider": "local",
            "extraUserData": { "apps": ["gfw"] }
        }
    ]
}
You can find a set of users given their ids using the following endpoint. The ids of the users to find should be provided in the ids field of the request body.
Please keep in mind that, under the hood, user management relies on Okta - for this reason, this endpoint depends on Okta's user search functionalities to find users by ids, and thus, inherits Okta's limitations. Okta limits user search at a maximum of 200 users per request, so in practice, this means we can only fetch pages of 200 users at a time. If you try to find, for instance, 400 users by ids, 2 requests will need to be made to Okta to fulfill this request, and as such, the performance of this endpoint might be degraded.
Due to these limitations, we advise only resort to this endpoint when you have no other valid alternative to find users. Even in that case, you might run into slow response times or, ultimately, not receiving the expected results when calling this endpoint.
Finding user ids by role
Request structure to find user ids by role:
curl -X GET https://api.resourcewatch.org/auth/user/ids/:role \
-H "Authorization: Bearer <your-token>" \
-H "x-api-key: <your-api-key>"
Example request to find user ids of ADMIN users:
curl -X GET https://api.resourcewatch.org/auth/user/ids/ADMIN \
-H "Authorization: Bearer <your-token>" \
-H "x-api-key: <your-api-key>"
Example response:
{
    "data": [
        "5e4d273dce77c53768bc24f9",
        "5e4d273dce77c53768bc24f8",
        "5e4d273dce77c53768bc24f7",
        "5e4d273dce77c53768bc24f6",
        "5e4d273dce77c53768bc24f5",
        "5e4d273dce77c53768bc24f4",
        "5e4d273dce77c53768bc24f3"
    ]
}
You can find the ids of the users for a given role using the following endpoint. Valid roles include "USER", "MANAGER" and "ADMIN". The response includes the array of ids matching the role provided in the data field.
Please keep in mind that, under the hood, user management relies on Okta - for this reason, this endpoint depends on Okta's user search functionalities to find users by role, and thus, inherits Okta's limitations. Okta limits user search at a maximum of 200 users per request, so in practice, this means we can only fetch pages of 200 users at a time. If you try to find, for instance, users for the "USER" role, since there's a high number of "USER" users, many requests will have to be made to Okta to fulfill this request. As such, the performance of this endpoint might be degraded.
Due to these limitations, we advise only resort to this endpoint when you have no other valid alternative to find users. Even in that case, you might run into slow response times or, ultimately, not receiving the expected results when calling this endpoint.
Also, please note that existing endpoints may rely on this endpoint to be able to fulfill their requests. This is the case of sorting or filtering datasets/widgets/layers by user role, for instance. As such, the performance of these endpoints may also be affected by the degradation of performance of this endpoint.
User Deletion
A User Deletion (or simply 'deletion') is a record of a user's deletion process. This record is created when a user deletion is requested, and tracks the process of deleting all of that user's data from the RW API. Note that a deletion, by itself, has no functional implication - creating a deletion will not delete a user account or any of its data, for example. It works solely as a tracking mechanism for the user's deletion process.
Each deletion model record has an overall status field, that can be either pending or done - the former indicates
that the deletion process was not fully completed automatically (there are still user resources left to be deleted); the
latter indicates that the deletion process has completed, and no user data remains in the RW API databases.
The exception to this is the deletion record itself, which will remain after the user data deletion process is completed. However, the deletion record does not contain any user personal information, nor does it contain any information uploaded by the user, and as such outside of the scope of deleting all user data from the platform.
Each deletion model record also has a series of boolean typed fields, each of which referring to a type of resource the RW API stores and that can uploaded by a user (dataset, widget, layer, etc). These fields are meant to track which of these resources have been successfully deleted.
User deletions come with a basic CRUD set of endpoints, all of which are only available to users with the ADMIN role,
and you will get a 403 HTTP error
if you try to access them without having the necessary permissions.
Getting all deletions
curl -X GET https://api.resourcewatch.org/v1/deletion \
-H "Authorization: Bearer <your-token>" \
-H "x-api-key: <your-api-key>"
Example response:
{
  "data": [
    {
      "type": "deletions",
      "id": "62bd87bab67dc765baf45597",
      "attributes": {
        "userId": "62bd87bab67dc765baf45596",
        "requestorUserId": "62bd87bab67dc765baf45596",
        "status": "pending",
        "datasetsDeleted": false,
        "layersDeleted": false,
        "widgetsDeleted": false,
        "userAccountDeleted": false,
        "userDataDeleted": false,
        "collectionsDeleted": false,
        "favouritesDeleted": false,
        "vocabulariesDeleted": false,
        "areasDeleted": false,
        "storiesDeleted": false,
        "subscriptionsDeleted": false,
        "dashboardsDeleted": false,
        "profilesDeleted": false,
        "topicsDeleted": false,
        "createdAt": "2022-06-30T11:23:38.002Z",
        "updatedAt": "2022-06-30T11:23:38.002Z"
      }
    }
  ],
  "links": {
    "self": "https://api.resourcewatch.org/v1/deletion?page[number]=1&page[size]=10",
    "first": "https://api.resourcewatch.org/v1/deletion?page[number]=1&page[size]=10",
    "last": "https://api.resourcewatch.org/v1/deletion?page[number]=1&page[size]=10",
    "prev": "https://api.resourcewatch.org/v1/deletion?page[number]=1&page[size]=10",
    "next": "https://api.resourcewatch.org/v1/deletion?page[number]=1&page[size]=10"
  },
  "meta": {
    "total-pages": 1,
    "total-items": 1,
    "size": 10
  }
}
This endpoint allows you to list all existing deletion records.
Pagination
Example request to load page 2 using 25 results per page
curl -X GET https://api.resourcewatch.org/v1/deletion?page[number]=2&page[size]=25 \
-H "x-api-key: <your-api-key>"
This endpoint adheres to the conventions defined in the Pagination guidelines for the RW API, so we recommend reading that section for more details on how paginate your deletion list.
Filters
Filtering deletions
curl -X GET https://api.resourcewatch.org/v1/deletion?status=done \
-H "x-api-key: <your-api-key>"
The deletion list provides filtering based on these 3 fields:
| Filter | Description | Type | Expected values |
|---|---|---|---|
| userId | Filter by the id of the user account to be deleted. | String | any valid user id |
| requestorUserId | Filter by the id of the user who requested the deletion. | String | any valid user id |
| status | Filter by the status of the deletion process. | String | done or pending |
Errors for getting all deletions
| Error code | Error message | Description |
|---|---|---|
| 401 | Not authenticated | You need to be logged in to be able to get all deletions. |
| 403 | Not authorized | You need to have the ADMIN role |
Getting a deletion by id
Request a deletion by id:
curl -X GET https://api.resourcewatch.org/v1/deletion/<deletion-id> \
-H "Authorization: Bearer <your-token>" \
-H "x-api-key: <your-api-key>"
Example response:
{
  "data": {
    "type": "deletions",
    "id": "62bd8d49cae089972ce81039",
    "attributes": {
      "userId": "62bd8d49cae089972ce81038",
      "requestorUserId": "62bd8d49cae089972ce81038",
      "status": "pending",
      "datasetsDeleted": false,
      "layersDeleted": false,
      "widgetsDeleted": false,
      "userAccountDeleted": false,
      "userDataDeleted": false,
      "collectionsDeleted": false,
      "favouritesDeleted": false,
      "vocabulariesDeleted": false,
      "areasDeleted": false,
      "storiesDeleted": false,
      "subscriptionsDeleted": false,
      "dashboardsDeleted": false,
      "profilesDeleted": false,
      "topicsDeleted": false,
      "createdAt": "2022-06-30T11:47:21.305Z",
      "updatedAt": "2022-06-30T11:47:21.305Z"
    }
  }
}
This endpoints allows you to retrieve the details of a single deletion record from its id.
Errors for getting a deletion by id
| Error code | Error message | Description |
|---|---|---|
| 401 | Not authenticated | You need to be logged in to be able to get a deletion. |
| 403 | Not authorized | You need to have the ADMIN role |
| 404 | Deletion not found | There is no deletion with the provided id |
Creating a deletion
Create a deletion for the current user
curl -X POST "https://api.resourcewatch.org/v1/deletion" \
-H "Authorization: Bearer <your-token>" \
-H "x-api-key: <your-api-key>"
Response:
{
  "data": {
    "type": "deletions",
    "id": "62bd8d49cae089972ce81039",
    "attributes": {
      "userId": "62bd8d49cae089972ce81038",
      "requestorUserId": "62bd8d49cae089972ce81038",
      "status": "pending",
      "datasetsDeleted": false,
      "layersDeleted": false,
      "widgetsDeleted": false,
      "userAccountDeleted": false,
      "userDataDeleted": false,
      "collectionsDeleted": false,
      "favouritesDeleted": false,
      "vocabulariesDeleted": false,
      "areasDeleted": false,
      "storiesDeleted": false,
      "subscriptionsDeleted": false,
      "dashboardsDeleted": false,
      "profilesDeleted": false,
      "topicsDeleted": false,
      "createdAt": "2022-06-30T11:47:21.305Z",
      "updatedAt": "2022-06-30T11:47:21.305Z"
    }
  }
}
Create a deletion for a specific user with custom data
curl -X POST "https://api.resourcewatch.org/v1/deletion" \
-H "Content-Type: application/json" \
-H "Authorization: Bearer <your-token>" \
-H "x-api-key: <your-api-key>" \
-d  \
'{
    "userId": "bd8a36df-2e52-4b2d-b7be-a48bdcd7c769",
    "userAccountDeleted": true
}'
Use this endpoint to create a deletion record for the user identified in the token. Note that this does not delete any user account or data - you should use the delete user endpoint to achieve that.
You can optionally specify the userId or any of the boolean type fields values in the body of your request.
The requestorUserId
is automatically set based on the user token passed as a request header. The status field is set to pending by
default.
Errors for creating a deletion
| Error code | Error message | Description |
|---|---|---|
| 400 | Deletion already exists for this user | There is already a deletion record for this userId. |
| 401 | Not authenticated | You need to be logged in to be able to create a deletion. |
| 403 | Not authorized | You need to have the ADMIN role |
Updating a deletion
Updating a deletion
curl -X PATCH "https://api.resourcewatch.org/v1/deletion/<deletion-id>" \
-H "Authorization: Bearer <your-token>" \
-H "x-api-key: <your-api-key>" \
-H "Content-Type: application/json" -d \
'{
  "status":"done"
}'
Response:
{
  "data": {
    "type": "deletions",
    "id": "62bd8d49cae089972ce81039",
    "attributes": {
      "userId": "62bd8d49cae089972ce81038",
      "requestorUserId": "62bd8d49cae089972ce81038",
      "status": "done",
      "datasetsDeleted": false,
      "layersDeleted": false,
      "widgetsDeleted": false,
      "userAccountDeleted": false,
      "userDataDeleted": false,
      "collectionsDeleted": false,
      "favouritesDeleted": false,
      "vocabulariesDeleted": false,
      "areasDeleted": false,
      "storiesDeleted": false,
      "subscriptionsDeleted": false,
      "dashboardsDeleted": false,
      "profilesDeleted": false,
      "topicsDeleted": false,
      "createdAt": "2022-06-30T11:47:21.305Z",
      "updatedAt": "2022-06-30T12:16:45.381Z"
    }
  }
}
Use this endpoint to update an existing deletion. Besides the several boolean type fields, you can also update
the status
field to either done or pending.
Errors for updating a deletion
| Error code | Error message | Description |
|---|---|---|
| 401 | Not authenticated | You need to be logged in to be able to update a deletion. |
| 403 | Not authorized | You need to have the ADMIN role |
| 404 | Deletion not found | There is no deletion with the provided id |
Delete a deletion
Deleting a deletion
curl -X DELETE "https://api.resourcewatch.org/v1/deletion/<deletion-id>" \
-H "Authorization: Bearer <your-token>" \
-H "x-api-key: <your-api-key>"
Response:
{
  "data": {
    "type": "deletions",
    "id": "62bd8d49cae089972ce81039",
    "attributes": {
      "userId": "62bd8d49cae089972ce81038",
      "requestorUserId": "62bd8d49cae089972ce81038",
      "status": "done",
      "datasetsDeleted": false,
      "layersDeleted": false,
      "widgetsDeleted": false,
      "userAccountDeleted": false,
      "userDataDeleted": false,
      "collectionsDeleted": false,
      "favouritesDeleted": false,
      "vocabulariesDeleted": false,
      "areasDeleted": false,
      "storiesDeleted": false,
      "subscriptionsDeleted": false,
      "dashboardsDeleted": false,
      "profilesDeleted": false,
      "topicsDeleted": false,
      "createdAt": "2022-06-30T11:47:21.305Z",
      "updatedAt": "2022-06-30T12:16:45.381Z"
    }
  }
}
Use this endpoint to delete an existing deletion.
Errors for deleting a deletion
| Error code | Error message | Description |
|---|---|---|
| 401 | Not authenticated | You need to be logged in to be able to delete a deletion. |
| 403 | Not authorized | You need to have the ADMIN role |
| 404 | Deletion not found | There is no deletion with the provided id |
Graph
The interaction with some of the graph endpoints is restricted to other RW API services - the following sections describe these endpoints. Keep in mind user-facing graph endpoints are described in detail in the graph endpoint documentation. The graph concept docs might also be a useful resource for learning what the RW API graph is and what it has to offer you.
Creating dataset graph nodes
POST request to create a dataset graph node:
curl -X POST https://api.resourcewatch.org/v1/graph/dataset/:id \
-H "Authorization: Bearer <your-token>" \
-H "x-api-key: <your-api-key>" \
-H "Content-Type: application/json"
This endpoint creates a graph node for the dataset with id provided in the URL path.
This endpoint is automatically called on dataset creation, so you don't need to manually do it yourself after you
create a dataset. In order to ensure that API users cannot manually create graph nodes for datasets, this endpoint
requires authentication from a RW API service, meaning that normal API users won't be able to call this endpoint
successfully. If, as an API user and using your user's token, you try to create a graph node for a dataset, you will
receive a response with HTTP status code 403 Forbidden.
Errors for creating dataset graph nodes
| Error code | Error message | Description |
|---|---|---|
| 401 | Unauthorized | No authorization token provided. |
| 403 | Not authorized | You are trying to call this endpoint without being identified as a RW API service. |
Creating widget graph nodes
POST request to create a widget graph node:
curl -X POST https://api.resourcewatch.org/v1/graph/widget/:idDataset/:idWidget \
-H "Authorization: Bearer <your-token>" \
-H "x-api-key: <your-api-key>" \
-H "Content-Type: application/json"
This endpoint creates a graph node for the widget with id provided in the URL path. It also creates a graph edge, connecting the newly created widget graph node to the graph node for the dataset associated with this widget.
This endpoint is automatically called on widget creation, so you don't need to manually do it yourself after you
create a widget. In order to ensure that API users cannot manually create graph nodes for widgets, this endpoint
requires authentication from a RW API service, meaning that normal API users won't be able to call this endpoint
successfully. If, as an API user and using your user's token, you try to create a graph node for a widget, you will
receive a response with HTTP status code 403 Forbidden.
Errors for creating widget graph nodes
| Error code | Error message | Description |
|---|---|---|
| 401 | Unauthorized | No authorization token provided. |
| 403 | Not authorized | You are trying to call this endpoint without being identified as a RW API service. |
| 404 | Dataset not found | No graph node for the dataset with id provided was found. |
Creating layer graph nodes
POST request to create a layer graph node:
curl -X POST https://api.resourcewatch.org/v1/graph/layer/:idDataset/:idLayer \
-H "Authorization: Bearer <your-token>" \
-H "x-api-key: <your-api-key>" \
-H "Content-Type: application/json"
This endpoint creates a graph node for the layer with id provided in the URL path. It also creates a graph edge, connecting the newly created layer graph node to the graph node for the dataset associated with this layer.
This endpoint is automatically called on layer creation, so you don't need to manually do it yourself after you
create a layer. In order to ensure that API users cannot manually create graph nodes for layers, this endpoint requires
authentication from a RW API service, meaning that normal API users won't be able to call this endpoint successfully.
If, as an API user and using your user's token, you try to create a graph node for a layer, you will receive a response
with HTTP status code 403 Forbidden.
Errors for creating layer graph nodes
| Error code | Error message | Description |
|---|---|---|
| 401 | Unauthorized | No authorization token provided. |
| 403 | Not authorized | You are trying to call this endpoint without being identified as a RW API service. |
| 404 | Dataset not found | No graph node for the dataset with id provided was found. |
Creating metadata graph nodes
POST request to create a metadata graph node:
curl -X POST https://api.resourcewatch.org/v1/graph/metadata/:resourceType/:idResource/:idMetadata \
-H "Authorization: Bearer <your-token>" \
-H "x-api-key: <your-api-key>" \
-H "Content-Type: application/json"
This endpoint creates a graph node for the metadata with id provided in the URL path. As you might have come across in the Metadata endpoint documentation, metadata is always associated with either a dataset, layer, or widget. So, when creating a graph node for a metadata entry, you must also provide the resource type (dataset, layer, or widget) and its corresponding id.
Calling this endpoint will also create a graph edge connecting the newly created metadata graph node to the graph node for the resource (dataset, layer, or widget) associated with it.
This endpoint is automatically called on metadata creation, so you don't need to manually do it yourself after you
create a metadata entry. In order to ensure that API users cannot manually create graph nodes for metadata entries, this
endpoint requires authentication from a RW API service, meaning that normal API users won't be able to call this
endpoint successfully. If, as an API user and using your user's token, you try to create a graph node for a metadata
entry, you will receive a response with HTTP status code 403 Forbidden.
Errors for creating metadata graph nodes
| Error code | Error message | Description |
|---|---|---|
| 401 | Unauthorized | No authorization token provided. |
| 403 | Not authorized | You are trying to call this endpoint without being identified as a RW API service. |
| 404 | Resource {:resourceType} and id ${:idResource} not found | No graph node for the resource with id provided was found. |
Deleting dataset graph nodes
DELETE request to remove a dataset graph node:
curl -X DELETE https://api.resourcewatch.org/v1/graph/dataset/:id \
-H "Authorization: Bearer <your-token>" \
-H "x-api-key: <your-api-key>" \
-H "Content-Type: application/json"
This endpoint deletes the graph node for the dataset with id provided in the URL path.
This endpoint is automatically called on dataset deletion, so you don't need to manually do it yourself after you
create a dataset. In order to ensure that API users cannot manually delete graph nodes for datasets, this endpoint
requires authentication from a RW API service, meaning that normal API users won't be able to call this endpoint
successfully. If, as an API user and using your user's token, you try to delete a graph node for a dataset, you will
receive a response with HTTP status code 403 Forbidden.
Errors for deleting dataset graph nodes
| Error code | Error message | Description |
|---|---|---|
| 401 | Unauthorized | No authorization token provided. |
| 403 | Not authorized | You are trying to call this endpoint without being identified as a RW API service. |
Deleting widget graph nodes
DELETE request to remove a widget graph node:
curl -X POST https://api.resourcewatch.org/v1/graph/widget/:id \
-H "Authorization: Bearer <your-token>" \
-H "x-api-key: <your-api-key>" \
-H "Content-Type: application/json"
This endpoint deletes the graph node for the widget with id provided in the URL path.
This endpoint is automatically called on widget deletion, so you don't need to manually do it yourself after you
delete a widget. In order to ensure that API users cannot manually delete graph nodes for widgets, this endpoint
requires authentication from a RW API service, meaning that normal API users won't be able to call this endpoint
successfully. If, as an API user and using your user's token, you try to delete a graph node for a widget, you will
receive a response with HTTP status code 403 Forbidden.
Errors for deleting widget graph nodes
| Error code | Error message | Description |
|---|---|---|
| 401 | Unauthorized | No authorization token provided. |
| 403 | Not authorized | You are trying to call this endpoint without being identified as a RW API service. |
Deleting layer graph nodes
DELETE request to remove a layer graph node:
curl -X POST https://api.resourcewatch.org/v1/graph/layer/:id \
-H "Authorization: Bearer <your-token>" \
-H "x-api-key: <your-api-key>" \
-H "Content-Type: application/json"
This endpoint deletes the graph node for the layer with id provided in the URL path.
This endpoint is automatically called on layer deletion, so you don't need to manually do it yourself after you
delete a layer. In order to ensure that API users cannot manually delete graph nodes for layers, this endpoint requires
authentication from a RW API service, meaning that normal API users won't be able to call this endpoint successfully.
If, as an API user and using your user's token, you try to delete a graph node for a layer, you will receive a response
with HTTP status code 403 Forbidden.
Errors for deleting layer graph nodes
| Error code | Error message | Description |
|---|---|---|
| 401 | Unauthorized | No authorization token provided. |
| 403 | Not authorized | You are trying to call this endpoint without being identified as a RW API service. |
Deleting metadata graph nodes
DELETE request to remove a metadata graph node:
curl -X POST https://api.resourcewatch.org/v1/graph/metadata/:id \
-H "Authorization: Bearer <your-token>" \
-H "x-api-key: <your-api-key>" \
-H "Content-Type: application/json"
This endpoint deletes the graph node for the metadata with id provided in the URL path.
This endpoint is automatically called on metadata deletion, so you don't need to manually do it yourself after you
delete a metadata entry. In order to ensure that API users cannot manually delete graph nodes for metadata entries, this
endpoint requires authentication from a RW API service, meaning that normal API users won't be able to call this
endpoint successfully. If, as an API user and using your user's token, you try to delete a graph node for a metadata
entry, you will receive a response with HTTP status code 403 Forbidden.
Errors for deleting metadata graph nodes
| Error code | Error message | Description |
|---|---|---|
| 401 | Unauthorized | No authorization token provided. |
| 403 | Not authorized | You are trying to call this endpoint without being identified as a RW API service. |
Associating concepts to graph nodes
POST request to associate concepts to a graph node:
curl -X POST https://api.resourcewatch.org/v1/graph/:resourceType/:idResource/associate \
-H "Authorization: Bearer <your-token>" \
-H "x-api-key: <your-api-key>" \
-H "Content-Type: application/json" \
-d '{
  "tags": ["health", "society"]
}'
This endpoint creates a graph edge, representative of the relationship between the resource identified in the URL path
and the concepts provided in the tags field of the request body.
This endpoint is automatically called when you associate the vocabulary "knowledge_graph" to a resource, so you
don't need to manually do it yourself. In order to ensure that API users cannot manually create graph nodes for metadata
entries, this endpoint requires authentication from a RW API service, meaning that normal API users won't be able to
call this endpoint successfully. If, as an API user and using your user's token, you try to call this endpoint, you will
receive a response with HTTP status code 403 Forbidden.
Errors for associating concepts with graph nodes
| Error code | Error message | Description |
|---|---|---|
| 401 | Unauthorized | No authorization token provided. |
| 403 | Not authorized | You are trying to call this endpoint without being identified as a RW API service. |
| 404 | Resource {:resourceType} and id ${:idResource} not found | No graph node for the resource with id provided was found. |
Updating concepts associated with graph nodes
PUT request to update the concepts associated to a graph node:
curl -X PUT https://api.resourcewatch.org/v1/graph/:resourceType/:idResource/associate \
-H "Authorization: Bearer <your-token>" \
-H "x-api-key: <your-api-key>" \
-H "Content-Type: application/json" \
-d '{
  "tags": ["health", "society"],
  "application": "rw"
}'
This endpoint updates the graph edge associated with the resource identified in the URL path. Existing concepts are
deleted and replaced with the ones provided in the tags field of the request body.
This endpoint is automatically called when you associate the vocabulary "knowledge_graph" to a resource, so you
don't need to manually do it yourself. In order to ensure that API users cannot manually create graph nodes for metadata
entries, this endpoint requires authentication from a RW API service, meaning that normal API users won't be able to
call this endpoint successfully. If, as an API user and using your user's token, you try to call this endpoint, you will
receive a response with HTTP status code 403 Forbidden.
Errors for associating concepts with graph nodes
| Error code | Error message | Description |
|---|---|---|
| 401 | Unauthorized | No authorization token provided. |
| 403 | Not authorized | You are trying to call this endpoint without being identified as a RW API service. |
| 404 | Resource {:resourceType} and id ${:idResource} not found | No graph node for the resource with id provided was found. |
Deleting concepts associated with graph nodes
DELETE request to remove concepts associated to a graph node:
curl -X DELETE https://api.resourcewatch.org/v1/graph/:resourceType/:idResource/associate \
-H "Authorization: Bearer <your-token>" \
-H "x-api-key: <your-api-key>" \
-H "Content-Type: application/json"
This endpoint deletes the graph edge associated with the resource identified in the URL path.
This endpoint is automatically called when you associate the vocabulary "knowledge_graph" to a resource, so you
don't need to manually do it yourself. In order to ensure that API users cannot manually create graph nodes for metadata
entries, this endpoint requires authentication from a RW API service, meaning that normal API users won't be able to
call this endpoint successfully. If, as an API user and using your user's token, you try to call this endpoint, you will
receive a response with HTTP status code 403 Forbidden.
Query parameters
Specifying the application of the resource to be deleted:
curl -X DELETE https://api.resourcewatch.org/v1/graph/:resourceType/:idResource/associate?application=gfw \
-H "Authorization: Bearer <your-token>" \
-H "x-api-key: <your-api-key>"
You can use the query parameter application to specify the application of the graph edge to be deleted by this
request. You can find out more information about this field here.
Errors for associating concepts with graph nodes
| Error code | Error message | Description |
|---|---|---|
| 401 | Unauthorized | No authorization token provided. |
| 403 | Not authorized | You are trying to call this endpoint without being identified as a RW API service. |
| 404 | Resource {:resourceType} and id ${:idResource} not found | No graph node for the resource with id provided was found. |
Creating favorite relationships between users and graph nodes
POST request to create favorite relationship between user and graph node:
curl -X POST https://api.resourcewatch.org/v1/graph/favourite/:resourceType/:idResource/:userId \
-H "Authorization: Bearer <your-token>" \
-H "x-api-key: <your-api-key>" \
-H "Content-Type: application/json" \
-d '{ "application": "rw" }'
This endpoint creates a graph edge representative of a favorite relationship between the resource identified in the URL path and the user id also identified in the URL path.
This endpoint is automatically called when you call vocabulary's create favorite endpoint, so you don't need to
manually do it yourself. In order to ensure that API users cannot manually create graph nodes for metadata entries, this
endpoint requires authentication from a RW API service, meaning that normal API users won't be able to call this
endpoint successfully. If, as an API user and using your user's token, you try to call this endpoint, you will receive a
response with HTTP status code 403 Forbidden.
Errors for associating concepts with graph nodes
| Error code | Error message | Description |
|---|---|---|
| 401 | Unauthorized | No authorization token provided. |
| 403 | Not authorized | You are trying to call this endpoint without being identified as a RW API service. |
| 404 | Resource {:resourceType} and id ${:idResource} not found | No graph node for the resource with id provided was found. |
Deleting favorite relationships between users and graph nodes
DELETE request to remove favorite relationship between user and graph node:
curl -X DELETE https://api.resourcewatch.org/v1/graph/favourite/:resourceType/:idResource/:userId \
-H "Authorization: Bearer <your-token>" \
-H "x-api-key: <your-api-key>" \
-H "Content-Type: application/json"
This endpoint deletes the graph edge representative of a favorite relationship between the resource identified in the URL path and the user id also identified in the URL path.
This endpoint is automatically called when you call vocabulary's delete favorite endpoint, so you don't need to
manually do it yourself. In order to ensure that API users cannot manually create graph nodes for metadata entries, this
endpoint requires authentication from a RW API service, meaning that normal API users won't be able to call this
endpoint successfully. If, as an API user and using your user's token, you try to call this endpoint, you will receive a
response with HTTP status code 403 Forbidden.
Query parameters
Specifying the application of the favorite relationship to be deleted:
curl -X DELETE https://api.resourcewatch.org/v1/graph/favourite/:resourceType/:idResource/:userId?application=gfw \
-H "x-api-key: <your-api-key>"
You can use the query parameter application to specify the application of the graph edge to be deleted by this
request. You can find out more information about this field here.
Errors for associating concepts with graph nodes
| Error code | Error message | Description |
|---|---|---|
| 401 | Unauthorized | No authorization token provided. |
| 403 | Not authorized | You are trying to call this endpoint without being identified as a RW API service. |
| 404 | Resource {:resourceType} and id ${:idResource} not found | No graph node for the resource with id provided was found. |